Overview of upgrade process and supportability to Version 2509
Endpoint Protector server 2509 represents a new step in Endpoint Protector. In this build we have updated many internal components, requiring the necessity for a new server image for all existing customers.
Additionally, during this milestone release, we are aligning our support policies to ensure that you benefit from the latest security, performance, and compatibility enhancements.
Why this version matters:
- Exclusive Full Support: Version 2509 will be the only version eligible for full support after a 120-day transition period.
- Action Required: All previous versions enter Limited Support immediately. To maintain full support, transition to version 2509 is necessary within the 120-day period.
- Future-Ready: Benefit from ongoing updates, including the newest features and critical security patches.
By upgrading to version 2509, organizations can ensure a robust and reliable Endpoint Protector environment. Make this transition part of your IT strategy to stay updated and secure.
Overview of the updated support statement for 2509 server
Please also read these important communications:
- Endpoint Protector SaaS Customers: Policy Change
- Client & Agent Supportability Statement
- Server Supportability Statement
For assistance with upgrading and support during the transition, please contact Netwrix Support.
Overview of the Transition Process to Endpoint Protector Server 2509
Endpoint Protector Server 2509 is a major rework that requires deployment as a new base image. It cannot be applied as a patch to an existing server. To transition successfully, you must first upgrade to 5.9.4.2 and create a backup, because only backups from version 5.9.4.2 are accepted by 2509.
The following checklist summarizes the entire upgrade path at a high level. Each step is explained in detail later in this document.
At-a-Glance Upgrade Checklist
- Verify your license file contains php_els.
- If missing, open a Support ticket for a refreshed license.
- Upgrade your current server to 5.9.4.2 and take a complete backup.
- Deploy a new 2509 VM from the latest image.
- Restore the 5.9.4.2 backup onto the new 2509 server.
- Choose new IP (not recommended) or same IP (recommended)
- Re-import your license into 2509 and confirm ELS for PHP = Active.
- Upload client packages (EPP 5.9.4.3 HF1 and EE 2509+ if applicable).
- IMPORTANT: For EE customers, it is important to upload both the EE Clients for Windows and macOS if both operating systems are in use.
- Re-enable client communications and verify check-ins/updates.
- Confirm trust and functionality: DPI, CAP, certificates, and EE status.
Why the 5.9.4.2 Step Matters
If you are running Endpoint Protector 5.7 or later, you must upgrade to 5.9.4.2 first. Backups taken from earlier versions will not restore onto 2509.
The required sequence is:
- Upgrade to 5.9.4.2.
- Back up your configuration.
- Deploy the 2509 server.
- Restore your 5.9.4.2 backup onto 2509 (two methods; explored later.)
- Re-import your updated license so underlying OS components can upgrade fully.
Again: this intermediate upgrade step to get to 5.9.4.2 is critical because only backups from version 5.9.4.2 will be accepted by version 2509. Here is a graphical overview of the full process:
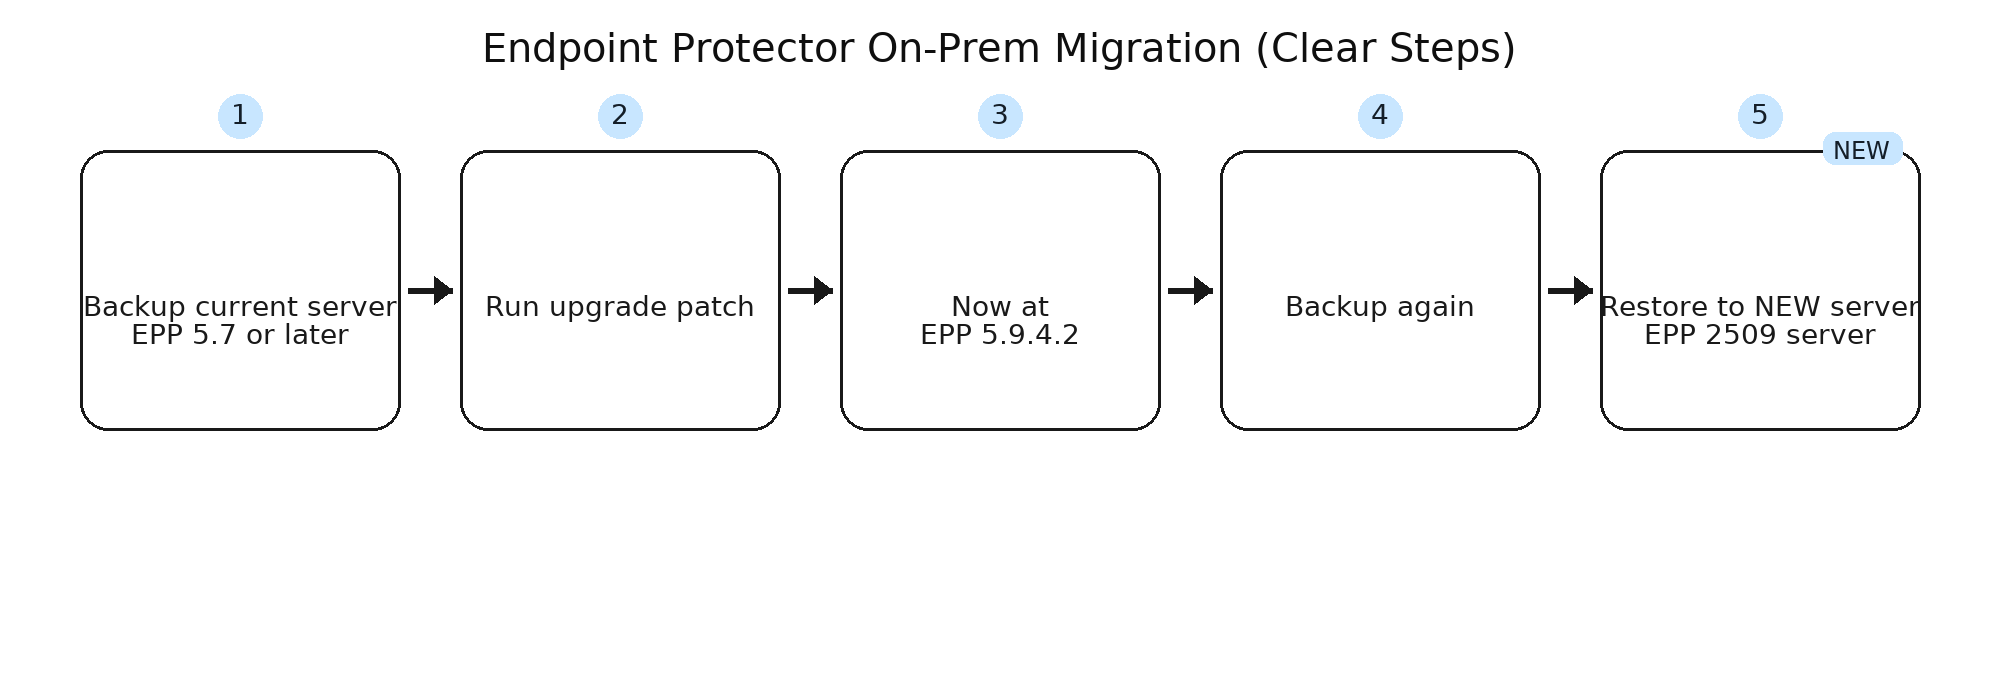
Therefore, this procedure outlines the process for upgrading to version 5.9.4.2 first, ensuring your environment remains updated and operational. This approach allows you to select options based on your requirements for certificate management and log retention during the migration process.
The Release Notes of the Cumulative Patch for version 5.9.4.2 contain useful information on how to perform the update, including educational videos and a FAQ section for additional guidance.
If your Endpoint Protector server is already at 5.9.4.2, you may skip ahead and jump directly to the “Migrating your Endpoint Protector Procedure: Migrating Your Endpoint Protector Appliance from 5.9.4.2 to 2509” toward the end of this document.
NOTE: Please note that the logs contained by the previous installation, as well as the file shadow backups made in that environment will not be migrated as they are not part of the Backup routine. Please refer to our documentation regarding the backup for such files.
Important: Licensing Changes for Endpoint Protector Server 2509 (Action Required)
2509 uses an updated license format. You must verify now whether your license file is in the new format and then re-import the license after your restore to 2509 is complete.
All on-premises / self-hosted customers upgrading to Endpoint Protector Server 2509 should verify they have the correct license in hand during this process.
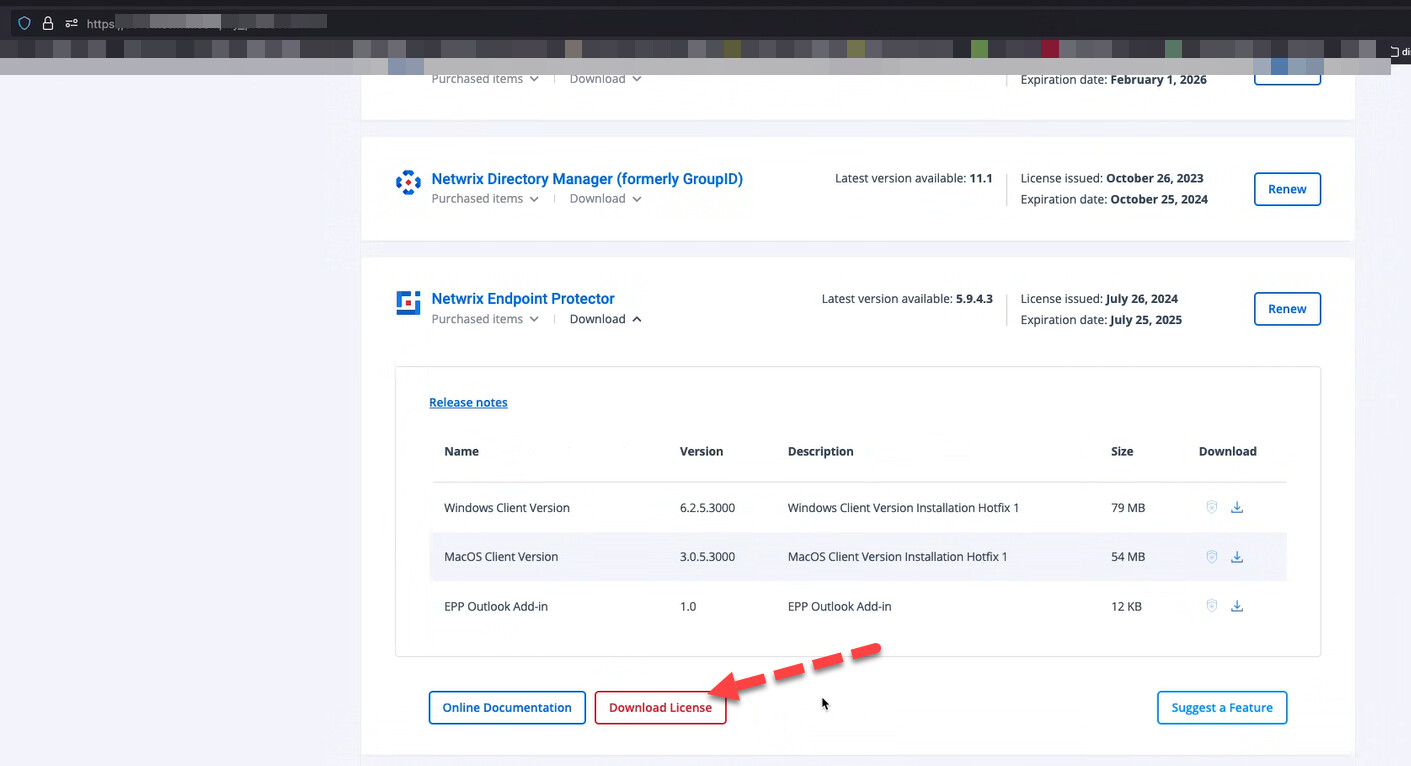
See if your key is present in the Netwrix My_Products portal underneath the Netwrix Endpoint Protector category. Then click Download License like what is seen here.
If you don’t have the license file handy, search your administrative mailbox for the original license message from “CoSoSys” or “Netwrix” and see if you can acquire your previous license file from your archive before continuing.
If you still cannot find it, then open a support ticket here.
Do I need a new license?
- Issued on or after January 1, 2025 → Already likely in the updated format. Typically no new license required.
- Issued before January 1, 2025 → Likely legacy format. Request a refreshed license.
How can I verify if my license the correct type?
Open your license .txt file and confirm it ends with a field like:
…,“modules”:[“DC”,“EL”],“php_els”:“your-unique-value”}}
- If php_els exists → you’re on the updated format.
- If php_els is missing (or you can’t find the file) → request a refreshed license.
What if I don’t update the license?
2509 will run and you can complete all backup/restore steps. However, some underlying OS components will not continue to upgrade until you import a license that includes php_els. For full platform currency and continued security on Endpoint Protector server, plan to re-import the updated license post-restore.
How to get/compare a refreshed license?
- Open a ticket using the Netwrix Support Portal with subject: “License refresh for Endpoint Protector 2509.” Attach your current license if available.
- (Recommended) Locate your prior license email from “CoSoSys” or “Netwrix.” When you receive the refreshed file, confirm it includes php_els and that these fields match your original license and entitlements:
- Support
- Number of endpoints
- Start Date / End Date / Validity
- Package Type
- Modules
If any values don’t match, do not import. Reply to the ticket and reference the discrepancy to have it corrected.
When do I actually import the license file again?
After you complete the restore to 2509 you will actually re-import the license. You will do these steps at the end of this document after the restore is complete. For now just keep the license with php_els file handy.
Upgrade from 5.7 (or later) to 5.9.4.2
In this section you’ll decide on your route to get your Endpoint Protector server from 5.7 to 5.9.4.2. Again, this is strictly required before you transition to 2509 server, because a restore TO 2509 server is only accepted FROM 5.9.4.2.
Preparation:
-
Backup: Create a complete backup of your current EPP environment before proceeding with the upgrade. This safeguards your system and data for restoration if necessary. Use this link for steps.
If possible, enhance your backup strategy with your own procedures by utilizing VM snapshots and backups in accordance with your organizational processes. -
Backup of Logs and/or File Shadows (optional): Please note that the logs contained by any installation, as well as the file shadow backups made in that environment will not be migrated. See the notes in this section for overview of how you can preserve Logs and/or File Shadows in an offline state before getting started in earnest in your upgrade process.
-
Client Updates: Note that the upgrade does not include client updates. You can download the latest client version independently after completing the appliance upgrade. Clients can be found in Netwrix My Products.
IMPORTANT: If you plan to utilize the “EPP Client upgrade” feature embedded in the EPP server, it’s essential to update the server with to the 5.9.4.3 clients, as this version is a prerequisite for future EPP Client updates due to changes in the EPP Client signature certificate. Please refer to 5.9.4.3 Client release notes.
Upgrade Path from 5.7 (or later) to 5.9.4.2 (First Step):
Remember, before proceeding, please ensure you have performed a backup of your 5.7 (or later) server.
Steps:
- Start by going to the Netwrix Community portal to download the patch you would like to use. This patch will get you from 5.7 (or later) to 5.9.4.2.
- Initiate the offline patch from the EPP interface as demonstrated in the video at the Community Portal website.
- Monitor progress through detailed logging provided during the process.
- Upon completion, verify the upgrade status. In case of failure, the system will automatically roll back to the pre-upgrade snapshot.
Post-Upgrade:
- Ensure that the upgrade has been successful by accessing the EPP environment and checking that version 5.9.4.2 is operational.
- Optionally, restore your environment to the previous version if the upgrade has failed.
(Optional Before Beginning) Export Logs and File Shadows from your current server
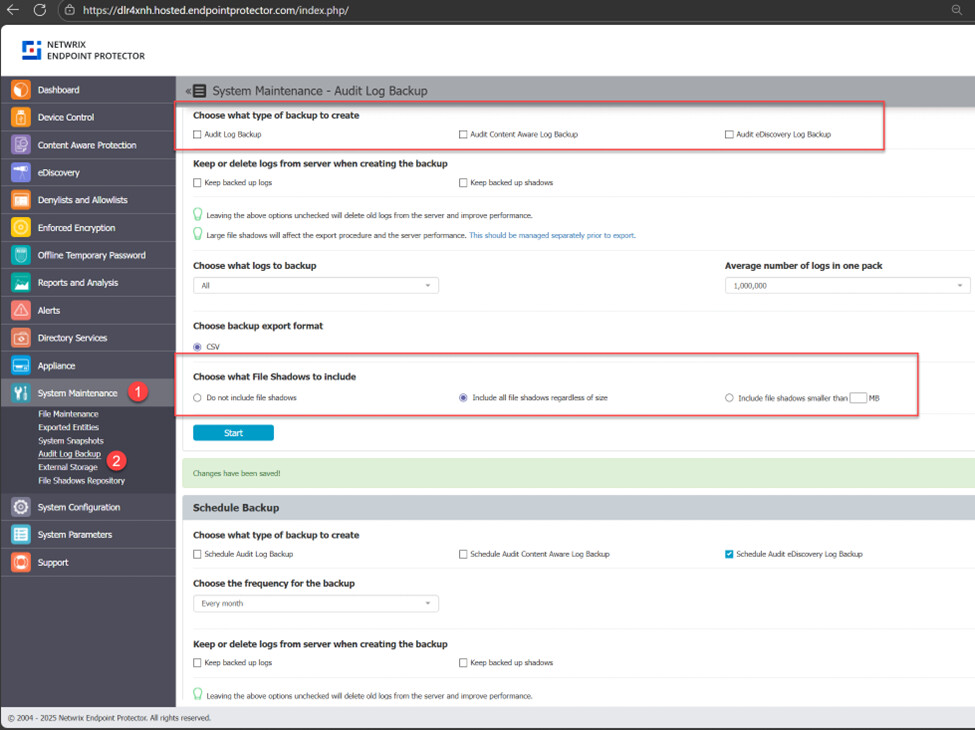
Note: This section is not talking about Audit Log Backup and Audit Backup Scheduler. If you need these logs, we offer several options like what type of logs to backup, how old should the included logs be, to keep or delete them from the server, to include file shadows or not, etc. https://docs.netwrix.com/docs/endpointprotector/admin/systemmaintenance/overview#audit-log-backup
Please note that the logs contained by any installation, as well as the file shadow backups made in that environment will not be migrated. Please refer to our documentation regarding the backup for such logs and files. But in no way can you restore them to your new server.
The basic steps toward backing up logs and File Shadows can be seen here.
Verify your Logs and File Shadows are stored away for future reference as, again, these will not be transferred over to your 2509 server.
Additional information:
- Please refer to Community portal announcement for additional reference, video guide and FAQs about cumulative 5.9.4.2 patch.
- If at any point you encounter any issues during the upgrade process, please reach out to our Support team for assistance.
Migrating Your Endpoint Protector Appliance from 5.9.4.2 to 2509
This section is for when you have successfully upgraded your Endpoint Protector appliance to 5.9.4.2 and you’re ready to transition to a new Virtual Machine image of 2509.
Preparation:
- Ensure your server is now at 5.9.4.2: Again, do not proceed unless your Endpoint Protector version is already 5.9.4.2.
- Backup Initial Setup: Create a complete backup of your current EPP environment (version 5.9.4.2) before proceeding with the upgrade. This will safeguard your data and facilitate restoration if needed. The Backup procedure can be found here.
- Disk Space Check: Ensure that you have at least 2GB free disk space available for the restore process.
- EPP Client Updates (downloadable from Netwrix My Products): Have the EPP Client 5.9.4.3 (with Hotfix 1 or later) as well as the Checksum files available and keep it handy. Release notes link for that client version is here.
- EE Clients (Enforced Encryption) Updates (downloadable from Netwrix My Products): Have the EE Client 2509 (or later) as well as the Checksum files available and keep it handy. Ensure that EE Clients for both Windows and macOS platforms are uploaded separately to cover both operating systems effectively. You can skip this point if you are not EE customer.
- Turn off EPP Clients communication: If possible, use network-level filtering to temporarily cut off EPP Client-Server communication during the migration procedure. This will help ensure that all collected logs stored at the endpoints are sent to the new instance when communication is restored.
- Check to see if you need to import the new license format. Follow the instructions above in the section Important: Licensing Changes in 2509 (Action Required)
Warning before continuing:
- If you reuse the same IP/FQDN on the 2509 server → EE trust is preserved. No action is needed.
- If you change the IP/FQDN on the 2509 server → EE trust is broken. End users will be forced to decrypt and then re-encrypt their drives.
Upgrade Process:
The first step of the process would be to Deploy a new VM with the latest 2509 image.
After that you have two choices when it comes to restoring:
- Choice 1 (Not Recommended): 2509 uses a new IP or FQDN
- Choice 2 (Recommended): 2509 keeps the same IP or FQDN as the original 5.9.4.2 server
Special warning about Enforced Encryption (EE): If you’re using Enforced Encryption, it is strongly recommended to reuse the old IP/FQDN pointing to the new server. This preserves trust and avoids requiring users to decrypt/re-encrypt. If you are using Enforced Encryption and use a completely new IP address for the 2509 server, there is no EE Client migration process. End-users must decrypt and encrypt the drives again.
Choice 1 (Not Recommended): 2509 Gets new IP or FQDN
While it’s easy to deploy a new 2509 server to a new IP, by choosing this method you will break the trust for DPI, CAP, etc.
To restore trust, after you use a new IP for 2509, you will need to install a new root CA on those devices to restore DPI within browsing.
Therefore, this method is only recommended if you’re exclusively using the Device Control module, and not CAP or DPI.
If you use an IP address for server details, please manually update the EPP client communication configuration details. This will necessitate redeployment of certificates across endpoints if you’re using CAP.
Note: Re-generating the EPP server certificate stack after a IP change might lead to high loading on the EPP server.
Initial steps are as follows:
- Restore the 5.9.4.2 backup on server 2509.
- Assign a new unique IP/FQDN to the 2509 server.
- If you changed the IP/FQDN:
- Redeploy certificate due to IP change.
- Update endpoint communication settings to point to the new IP/FQDN. (Tip: Only Netwrix support has a script which can help you mass change existing clients to the new IP address.)
Warning: Do not yet turn on Client Communication between the Clients and Server yet.
Choice 2 (Recommended): 2509 Gets the same IP or FQDN of the of the original 5.9.4.2 server
This path replaces the 5.9.4.2 server with a fresh 2509 server – then keeps the same IP.
This method avoids certificate redeployment, ensuring DPI functionality remains intact and keeps EE clients connected to their known server.
Steps are as follows:
- Change the 2509 server IP/FQDN to the old 5.9.4.2 value.
- Restore the 5.9.4.2 backup on 2509
This will restore the original certificates; the restore detects the IP/FQDN change and rebinds certs accordingly.
Warning: Do not yet turn on Client Communication between the Clients and Server yet.
Warning: To prevent auto-update issues for EE clients or integrity errors, ensure that EPP/EE Clients are uploaded before they begin communicating with the new EPP Server. You will update the Endpoint Protector and EE clients in a few steps before turning back on client to server communication.
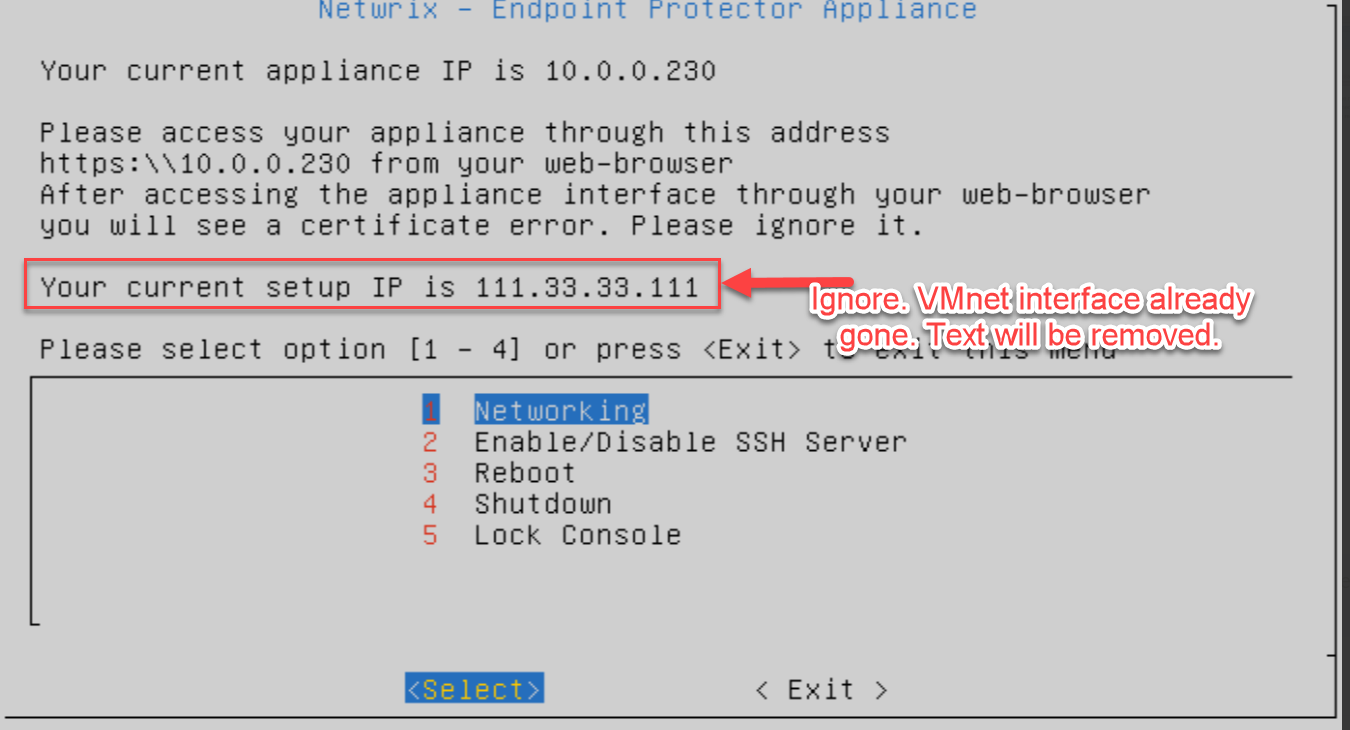
NOTE: A bug is reported such that IP address (spelled incorrectly as Asdress) may not be accepted. The work around is that both DNS fields to be filled or the settings will not save. Quick fix is to add a 2nd DNS address or use the Google DNS IPs (8.8.8.8 or 4.4.4.4)

NOTE: A bug is reported such that the mention of an old (and now UNUSED) VM network card (now deprecated) is still mentioned as 111.33.33.111 in the VM console. This can be safely ignored as the second VM network was completely removed from the server. The text reference will be completely removed in an upcoming patch / release.
License Reintroduction to 2509 server
As previously stated, after the Backup and Restore to 2509 server is complete, you will need to re-introduce the license file which contains the string similar to:
…,“modules”:[“DC”,“EL”],“php_els”:“unique-value-for-you”}}
In a previous step, you found or re-acquired this license file and verified that the values in the license file match your expectations of your entitlements.
Do not proceed with the next steps of reintroducing the license file back into Endpoint Protector Server until you’ve verified the license file matches your expected entitlements or you will downgrade your licensing.
When ready to reintroduce your license with the php_els string file back into 2509, select System Configuration | System License then Import License.
To verify the php_els part was accepted go to Appliance->Server Information like what’s seen here.
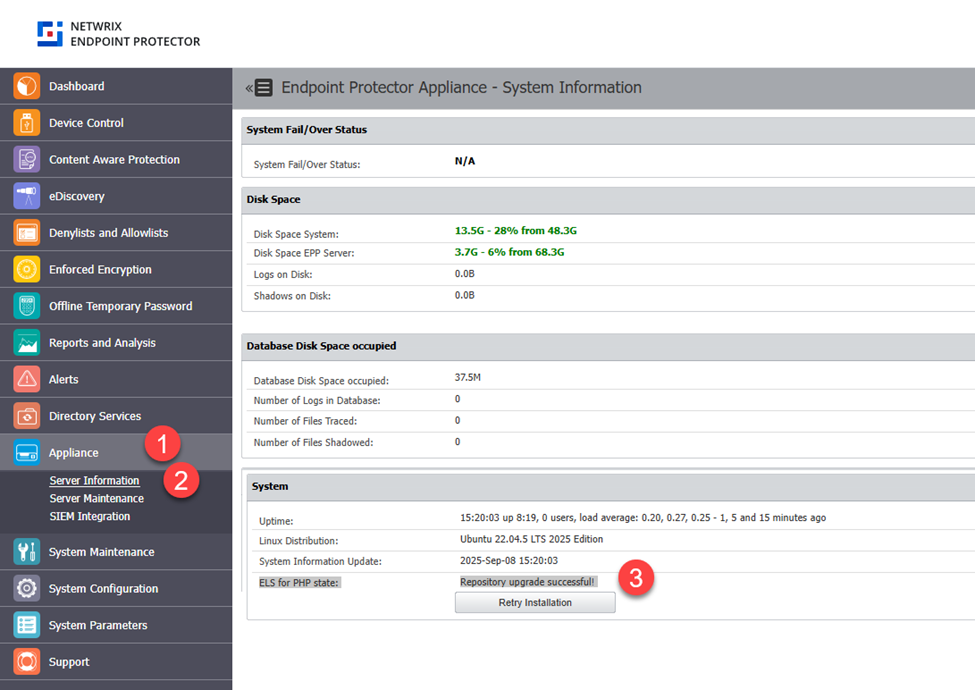
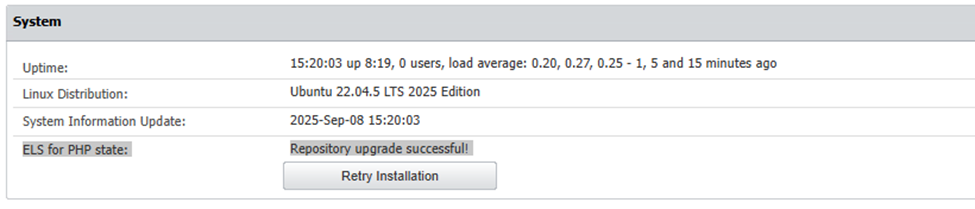
Check the message under ELS for PHP state. If the message is similar to the screenshot below, your license is up to date and underlying security updates to the operating system will be accepted.
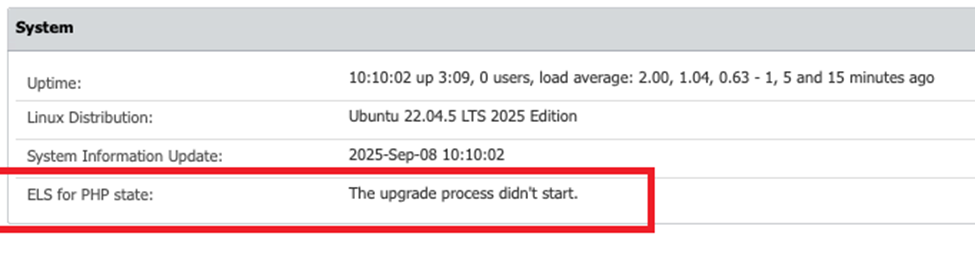
If there is a problem with the php_els part of the license you will see something like:
Client Download and Re-Introduction to Endpoint Protector Server
As stated earlier, Endpoint Protector Server version 2509 and later will not ship with the client pieces (Endpoint Protector Agent and Easy Lock Clients) embedded into the server release.
As such you will need to re-introduce the clients back into the server if you use the server as a delivery and/or update mechanism for the client.
IMPORTANT NOTE (Read Before Upgrading Clients)
If you use the in-Endpoint Protector Server Client updater, you will need to soon upgrade your clients to 5.9.4.3 before continuing onward to future client versions (2510.x.x.x) and beyond.
Note: You don’t need perform the updated 5.9.4.3 client rollout to your full estate today in conjunction with your Endpoint Protector 2509 server. In these steps we will simply priming Endpoint Protector server with Endpoint Protector 5.9.4.3 clients to facilitate a future client upgrade path.
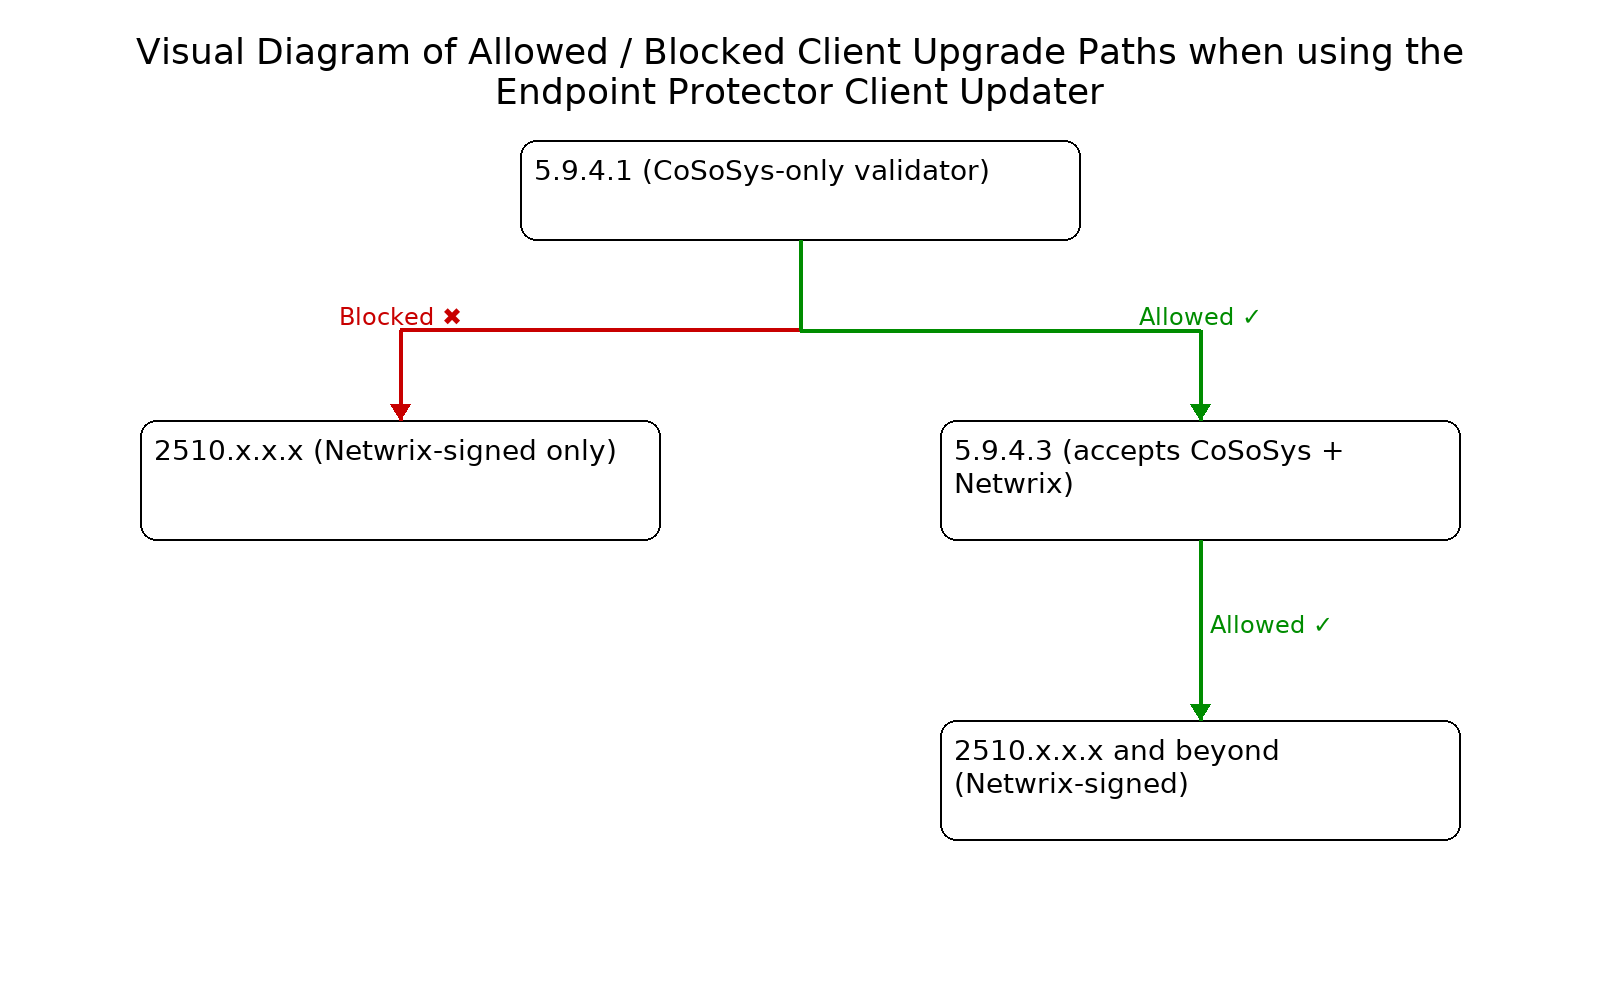
Why is this necessary?
- 5.9.4.1 clients only trust installers signed by CoSoSys.
- 5.9.4.3 clients are still signed by CoSoSys, but their validator was updated to trust both CoSoSys and Netwrix signatures.
- 2510.x.x.x clients and beyond will be signed only by Netwrix.
- Therefore, 5.9.4.3 client on the endpoint is the required “bridge” that makes the jump possible.
What happens if you don’t?
- If you try to upgrade 5.9.4.1 → 2510.x.x.x directly, the client will reject the installer.
- Your upgrade will fail every time.
- Your only fallback will be a manual uninstall and clean install of the 2510.x.x.x client.
What must you do (when you’re ready to upgrade your clients using the Endpoint Protector Client Upgrade process?
- Upgrade all clients from 5.9.4.1 (or earlier) → 5.9.4.3 first. (You may jump from clients as early as 5.8.1.0 to 5.9.4.3 if you wish.)
- Once clients are on 5.9.4.3, you can then upgrade them to upcoming (not yet released) 2510.x.x.x (and all future versions) through the EPP Server tool.
- Do not skip this step — getting clients first to 5.9.4.3 is mandatory for smooth upgrades (if you use the Endpoint Protector Client updater).
Visual Diagram of Allowed / Blocked Client Upgrade Paths when using the Endpoint Protector Client Updater
Priming Endpoint Protector Server with Latest Clients and Agents
You may already have prepared for these steps earlier. But as a reminder use Netwrix My Products to:
- Download the Windows and/or Mac Endpoint Protector Client and Checksum files. See the release notes here.
- Download the Enforced Encryption (EE) Client 2509 (or later) and Checksum files. You can skip this point if you are not EE customer.
Step 0: Download the Clients and the Checksums and keep them handy.
Tip: This screenshot shows Windows and Mac Clients, but you should also see Enforced Encryption (Easylock) clients 2509.4.1.0 or later for Windows and MacOS in the Netwrix My Products.
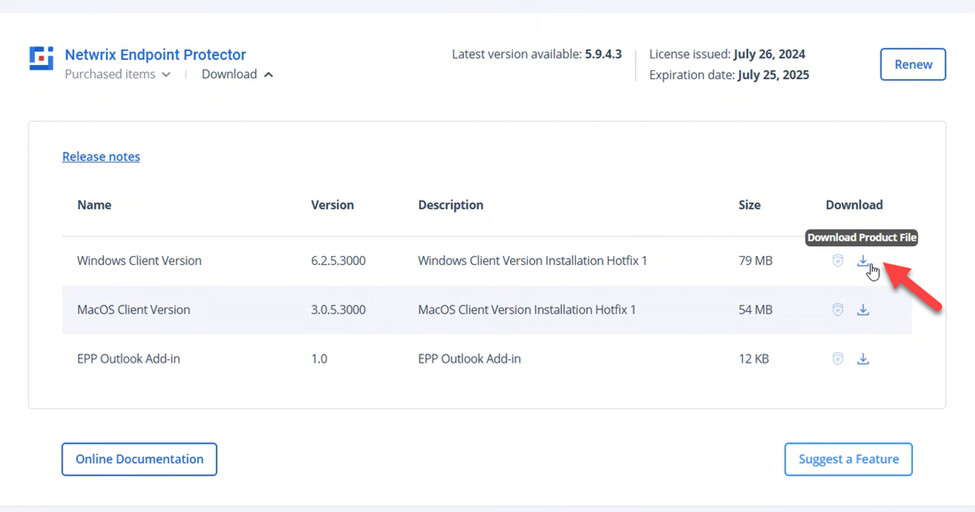
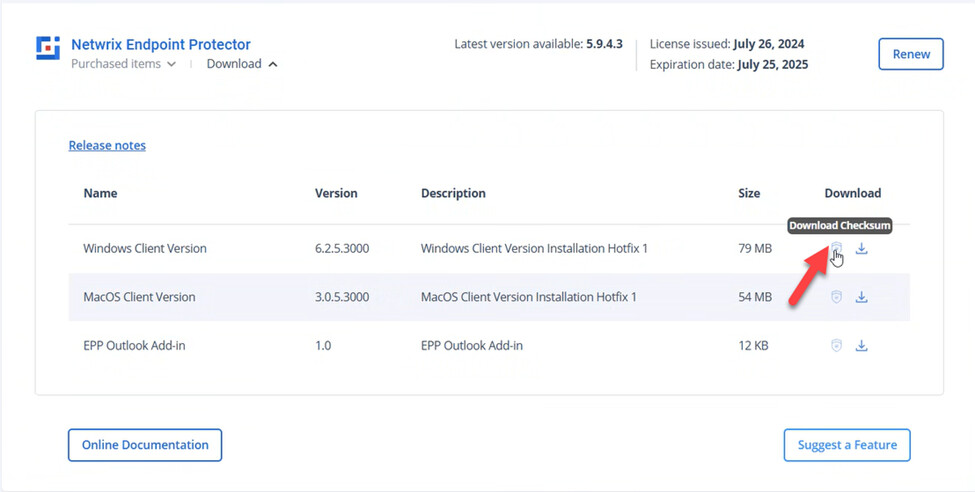
TIP: Recommend to use right click and “Save Link As” option on Windows or two finger click and “Download Linked File” on Mac to save signature file with original file name

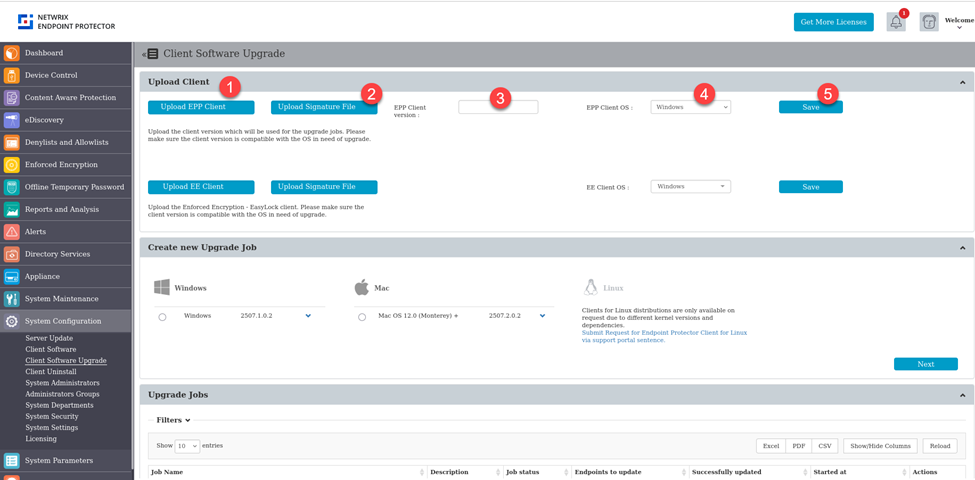
Step 1: Upload the Endpoint Protector Client(s) onto Endpoint Protector server
Perform the Windows and/or Mac client upload using below steps.
-
Chose downloaded EPP Client file for Windows or macOS (field 1)
-
Chose downloaded checksum file (field 2)
-
Fill up Endpoint Protector Client Version (field 3) reflecting downloaded agent, for example, put in 6.2.5.3000 for Windows and 3.0.5.3000 for MacOS. For “EPP Client OS” (field 4) use one from dropdown list accordingly.
Note: Future versions of Endpoint Protector Server will automatically determine this value on upload. For now, carefully put in the correct value (which can be seen in the Netwrix download page.)
-
Click Save (field 5)
Step 2: Upload the Enforced Encryption (Easylock) Client(s) onto Endpoint Protector server if you are using Enforced Encryption
Perform doing these steps. One for Windows and again for Mac.

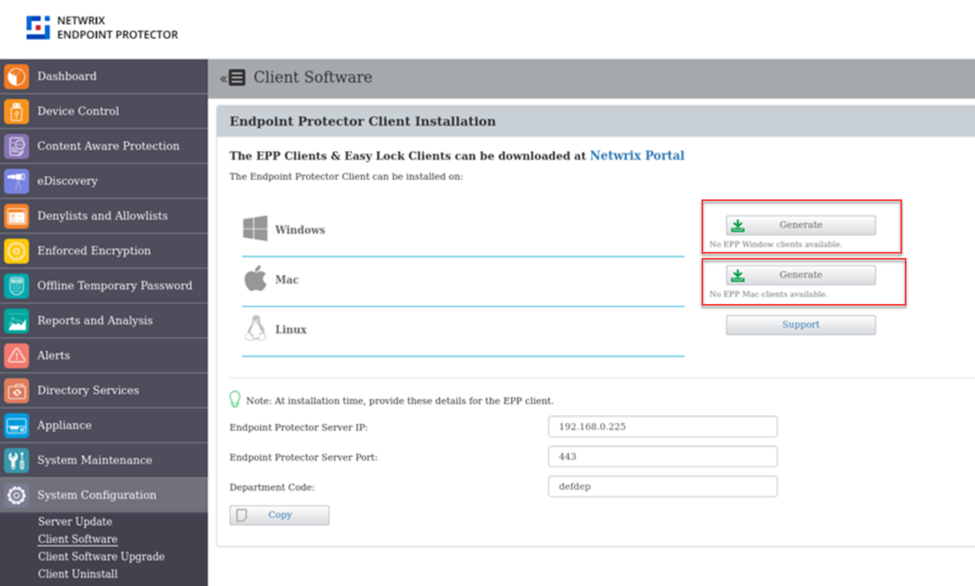
Step 3: (optional): Re-Generate the Windows and/or Mac agents with embedded values for 3rd party software distribution tools. To achieve that please move to System Configuration Client software page, and click “Generate” on needed EPP Client version (for macOS and Windows). For Linux, as previously reach out EPP Support.
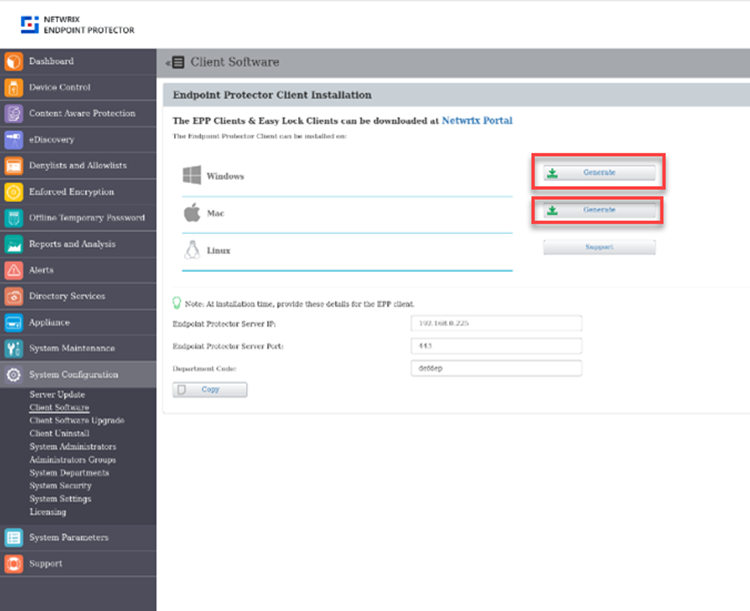
If you miss first step in uploading EPP Clients via Client Software Upgrade, when you click Generate you will receive an error as seen here: “No Endpoint Protector client available.”
Final Checklist (Before Restoring Client Communications)
This is a recap of the steps you should have completed while following this document:
- Verify your license file contains php_els.
- If missing, open a Support ticket for a refreshed license.
- Upgrade your existing server to version 5.9.4.2 and take a complete backup.
- Deploy a new 2509 VM from the latest image.
- Restore your 5.9.4.2 backup onto the new 2509 server.
- Choose Basic Restore or Double Restore (recommended).
- Re-import your license into 2509 and confirm ELS for PHP = Active.
- Upload client packages into 2509 (EPP 5.9.4.3 HF1 and EE 2509+, if applicable).
Restoring Client Communications
Once the 2509 server is restored, licensed, and client packages are installed:
- Re-enable client-to-server communication.
- Verify that endpoints successfully check in and, if applicable, receive updates.
- Confirm trust and functionality for DPI (Decryption Proxy Inspection), CAP (Certificate-Aware Proxy), certificates, and EE (Enforced Encryption) status.
Final Verification Steps
To ensure the migration is fully successful:
- Server health: Confirm the 2509 environment is operational and the php_els license is accepted (ELS for PHP = Active).
- Client updates: Confirm EPP clients (5.9.4.3 Hotfix 1) and EE clients (2509+) are reintroduced and available in the server.
- Note: There is no server version 5.9.4.3 — only the client carries that version number.
- Compliance & security: Verify alignment with organizational security and compliance standards.
- Backups: Schedule and confirm recurring backup jobs to maintain recoverability.
- Post-deployment checks: Spot-check policies, logging, and settings across a sample of endpoints to confirm correct operation.
Important Notices:
- Please note that the logs contained by the previous installation, as well as the file shadow backups made in that environment will not be migrated. Please refer to our documentation regarding the backup for such files.
- Customers who change the EPP server IP address or FQDN must plan for EE decrypt/re-encrypt. Customers who reuse the same IP/FQDN do not need to re-encrypt.
- For any issues encountered during the upgrade and restore process, please contact our Support team for assistance.