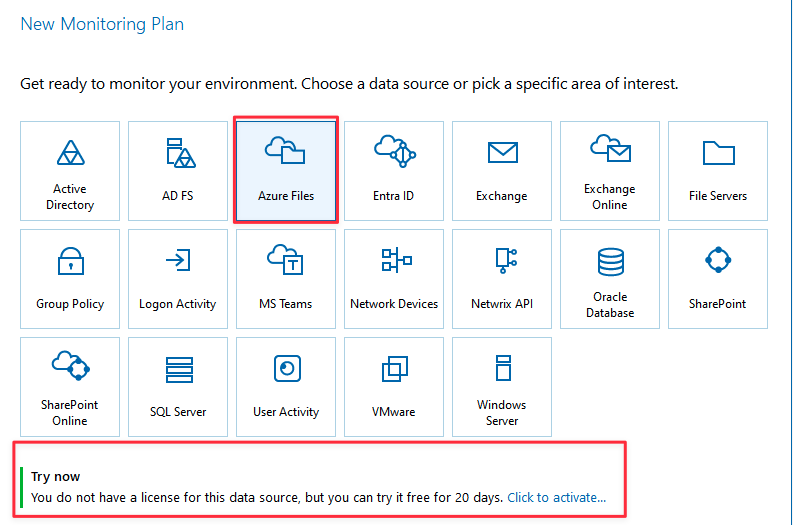
Add a new monitoring plan
Follow the steps to add a new monitoring plan with Azure Files data collector.
-
Go to Home > Monitoring Plans.
-
Click Add Plan.
-
Select Azure Files from the list.
-
Create audit database by using default SQL Server settings or custom connection parameters.
-
Select a delivery method for sending emails with reports, alerts, activity and health summaries.
-
To configure notifications with SMTP, see the Enable Notifications via SMTP documentation topic for additional information.
-
To configure notifications with Exchange Online, see the Enable Notifications via Exchange Online topic for additional information.
-
-
Provide name and description (optional) for the monitoring plan. Make sure to select “Add item now” checkbox if you want to start monitoring your data source right after the initial configuration.
-
Specify Item for Monitoring:
- Storage Account
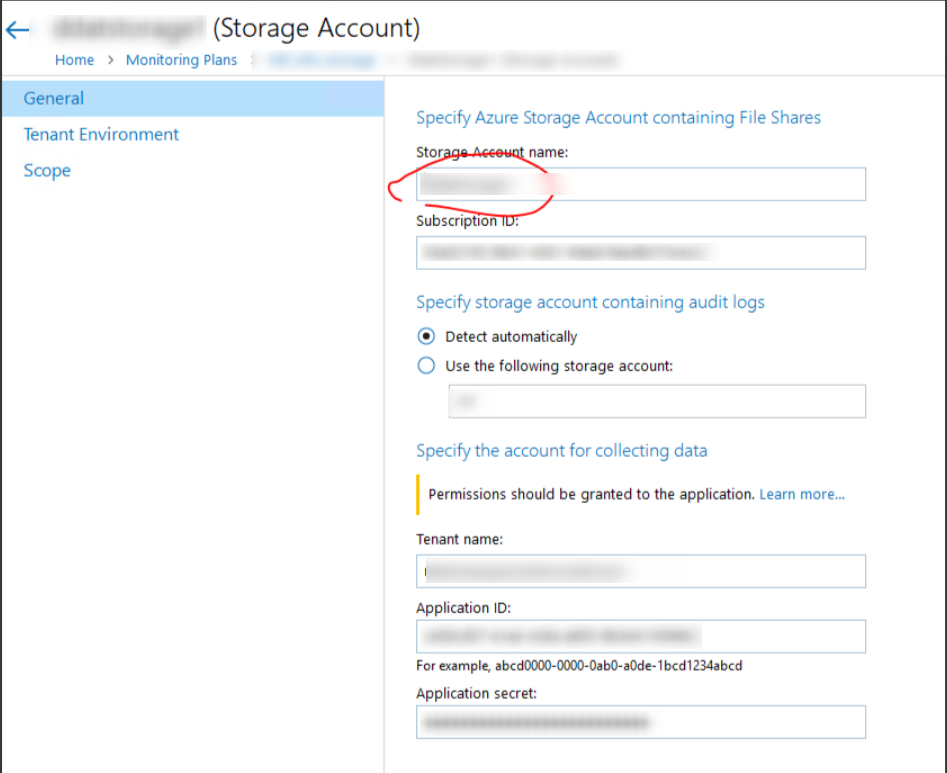
| General | To specify Azure Storage Account that contains File Shares, you need to provide the following information: • Storage Account name — Specify the name of the storage account you will use • Subscription ID — Specify the subscription that contains Azure service with this storage account.To determine the logs, you need to specify an account that contains audit logs. You can either allow Netwrix Auditor to detect it automatically or select an existing storage account where you want to put the logs.Collector requires two storage accounts: one for shares with data and another for audit logs.Caution: It is recommended to use one account for logs storage, if you are planning to use auto-detection feature in the Netwrix Auditor. If you have multiple accounts, only one storage account for logs is expected in addition. Specify the desired one manually to ensure that Netwrix Auditor collects the appropriate audit logs to identify user activities. Azure does not allow hosting logs at the same account. To specify the account for collection data, you need to provide the following credentials: • Tenant name • Application ID • Application secret |
| Tenant Environment | If you are using a government tenant, please click the Tenant Environment tab and select the desired tenant environment. |
| Scope | To specify monitoring exclusions, you need to click on the “Exclude data matching these criteria” checkbox and click Add Exclusions button. |
- Azure Subscription
Note: Subscription automatically identifies which target and storage account the Monitoring Plan will use to track logs.
| General | To specify Azure Subscription, you need to provide the following credentials: • Subscription name • Subscription IDNote: Netwrix Auditor does not allow you to specify logs storage account manually. All diagnostic settings are expected to have an unambiguous storage account.To specify the account for collection data you need to provide the following credentials: • Tenant name • Application ID • Application secret |
| Tenant Environment | If you are using a government tenant, please click the Tenant Environment tab and select the desired tenant environment. |
| Scope | To specify monitoring restriction, you need to click on the “Exclude these objects” checkbox and add exclusions by selecting the type: • Storage account • Resource groupProvide the name of the selected exclusion. |
Azure Files monitoring plan has been created and ready for configuration.
Configuration
Double click on the “Azure Files” to access the following settings:
General
-
Monitor this data source and collect activity data — Enable monitoring of the selected data source and configure Auditor to collect and store audit data.
-
Specify actions for monitoring — Specify actions you want to track and auditing mode.
Changes
| Successful | Use this option to track changes to your data. It helps to find out who made changes to your files, including their creation and deletion. |
| Failed | Use this option to detect suspicious activity on Azure Files. It helps to identify potential intruders who tried to modify or delete files, etc., but failed to do it. |
Read access
| Successful | Show successful attempts to read files. |
| Failed | Use this option to track suspicious activity. Helps find out who was trying to access your private data without proper justification.Enabling this option on public shares will result in a high number of events generated on Azure Files and the amount of data written to the Long-Term Archive. |
Please note that read access auditing significantly increases the number of audit events stored in the AuditArchive.
In addition, due to the way Azure Files auditing works, certain bulk operations such as mass deletions or modifications may produce significantly more audit events than the actual number of file actions. This can affect event processing speed and may increase Azure costs, since each event requires a request to Blob Storage.
Netwrix is working on optimizations to minimize these effects while preserving full audit visibility.
Users
- Specify monitoring restrictions — You can fine-tune Netwrix Auditor by specifying data that you want to exclude from the Azure Files monitoring scope. To do so, click Add and provide the name of the user you want to exclude in the following way (through the UPN):

Monitored Object Types, Actions, and Attributes
Examine the list of actions that have been audited and reported by Azure Files data collector in the Netwrix Auditor.
| File | Folder | Share | |
|---|---|---|---|
| Added | + | + | + |
| Add (failed attempt) | + | + | – |
| Modified | + | + | + |
| Modify (failed attempt) | + | + | – |
| Moved | + | + | – |
| Move (failed attempt) | + | + | – |
| Read | + | – | – |
| Read (failed attempt) | + | + | – |
| Renamed | + | + | – |
| Renamed (failed attempt) | – | – | – |
| Removed | + | + | + |
| Remove (failed attempt) | – | – | – |
| Copied | – | – | – |
Ports and Protocols
See the full list of protocols and ports required for Netwrix Auditor for Azure Files.
| Port | Protocol | Source | Target | Purpose |
|---|---|---|---|---|
| 443 | TCP | Netwrix Auditor Server | For a comprehensive list of Azure portal safe listed URLs, refer to the following Microsoft article: Allow the Azure portal URLs on your firewall or proxy server - Azure portal | Microsoft Learn | *.login.microsoftonline.com *.azure.com *.file.core.windows.com |
Configure Microsoft Azure application
Azure Files offers fully managed file shares in the cloud that are accessible via the industry standard Server Message Block (SMB) protocol.
To create a storage account and resource group, refer to the following Microsoft articles:
- https://learn.microsoft.com/en-us/azure/storage/files/storage-files-introduction
- https://learn.microsoft.com/en-us/azure/healthcare-apis/register-application
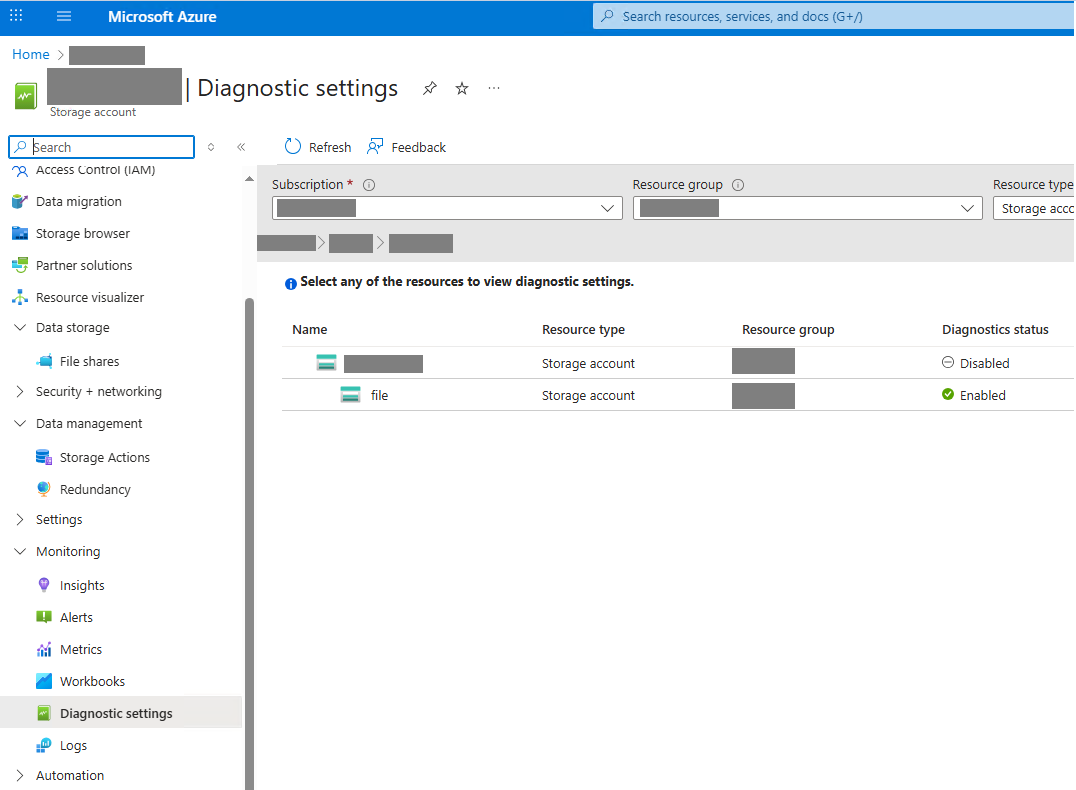
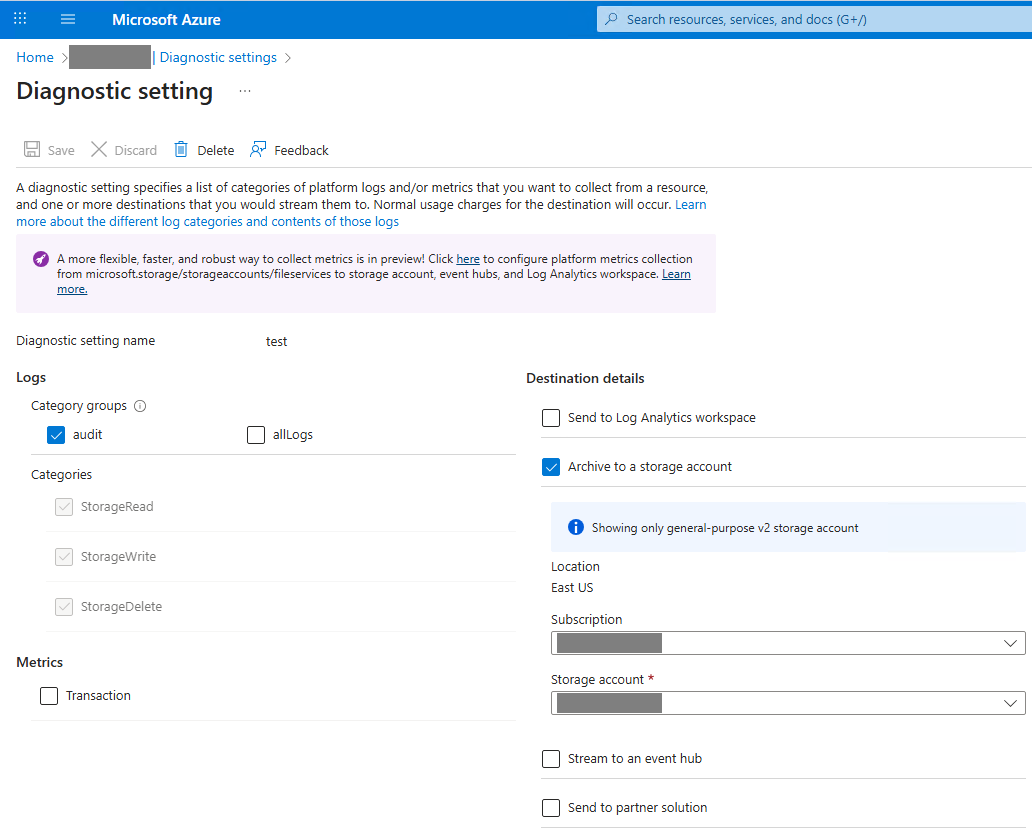
Follow the steps to configure storage account for saving audit logs.
- Go to Storage account with share > Monitoring > Diagnostic settings > file > Add diagnostic settings.
- Set the name of diagnostic settings.
- Select the log categories you need.
- Select Archive to the storage account.
- Choose resource group and storage account to store audit logs.
For additional information, refer to the Monitor Azure Files Microsoft article.
API Permissions
We need a separate Application created in EntraID. Below are the permissions to be configured for it (API, for resource group and storage account).
App registrations\API permissions:
- Microsoft Graph\User.Read — default permission for all created Applications
- Microsoft Graph\User.Read.All (type: Application) — for successfully resolving user SIDs by the collector.
Azure resource group and storage account with file shares:I
- Resource group for the storage account\Access Control (IAM)\Reader (for Application) — to allow reading the structure of all file shares within the resource group of the monitored storage account.
- Storage account\SMB File share\Access Control (IAM)\Storage File Data Privileged Reader (for Application) — to read metadata for the specified file share.
Azure storage account with audit logs:
- Storage account\Access Control (IAM)\Storage Blob Data Reader (for Application) —to read audit data located in blobs within containers.
Resource Group
To configure storage account in the Microsoft Azure Application, perform the required steps below.
Go to “Access Control (IAM)”. Click Add role assignment and select “Reader” from the Roles list. Click Next. Select member from the pop-up search window. Member here is the application that you have created before and gained the required permissions. Click Select and confirm the action.
After that, go to “Overview” and choose the storage account with data. Go to “Access Control (IAM)”. Click Add and select Storage File Data Privileged Reader from the Roles list. Click Next. Select member from the pop-up search window. Click Select and confirm the action.
The last permission you need is the permission for storage with logs, which is Storage Blob Data Reader. Click Add role assignment and select group from the pop-up search window. After that, click Review + assign.
Note: It is not necessary that storage account with data and storage account with logs will be in the same resource group.
OR
You can put that storage account with data and storage account with logs in the different resource groups.
The following identity sources are supported:
- Active Directory Domain Services (AD DS)
- Microsoft Entra Kerberos
Click Set up and follow the provided steps. Refer to the AD DS and Kerberos Microsoft articles for additional information.
Note: Microsoft Entra Domain Services is not supported yet.
Note: The network protocol that is currently supported is SMB.
Azure Files Auditing Behavior
When monitoring Azure Files, be aware that some types of activity may produce a disproportionately large number of audit events.
-
Examples: Mass deletions, bulk file modifications, or large-scale read operations.
-
Impact: Event volume can exceed the actual number of file operations, which may:
-
Slow down event processing.
-
Increase Azure billing, since every event is logged to Blob Storage.
-
-
Next steps: Netwrix is actively improving how Netwrix Auditor processes Azure Files logs to reduce overhead and optimize costs, while keeping visibility complete.
Netwrix Auditor Configuration for Azure Files – End-User Setup Guide
This guide explains how to configure Azure Files auditing with Netwrix Auditor.
You will:
-
Register and configure an Azure App in Microsoft Entra ID
-
Assign API permissions and IAM roles
-
Configure Diagnostic settings in Azure Files
-
Add and configure an Azure Files monitoring plan in Netwrix Auditor
Netwrix_Auditor_Azure_Files_Guide.pdf (150.7 KB)