In this post I will take you through the P-RODCAdminRevealed risk in PingCastle and show you how you can remediate this issue if it has happened in your environment.
What leads to this risk?
The P-RODCAdminRevealed risk specifically is attempting to look for administrative users (Domain Admins etc) that have been exposed on a Read-Only Domain Controller (RODC) and thus the RODC has a cached credential of that user on it in its NTDS.dit file.
So, why is it important?
RODC’s are made to help authentication flows whilst offering protection to your domain. A specific case may be using RODCs in a small remote office where physical security is lacking or maybe general process dictates that a non-technology person may need to get onto this to help basic troubleshooting etc. These are not the only reason you may use a RODC but the takeaway should be that they can be used in these potentially risky scenarios whilst also not exposing secrets of your entire domain.
You can read more on RODC Placement here.
So, how does it work and how do I know what accounts have been exposed to the RODC?
Firstly, let’s talk about how you can control password exposure from the offset of installing RODC’s. This control for this is called the Password Replication Policy and each RODC has one that can be configured as part of the setup.
By default the password replication policy includes many of the built-in security groups such as Domain Admins, Schema Admins, Enterprise Admins along with two groups specifically made for RODCs:
- Allowed RODC Password Replication Group.
- Denied RODC Password Replication Group.
These two groups are meant to be used as a global filter for what accounts can be exposed to a RODC. However, when deploying many RODCs with different account requirements it would be expected that there would be a specific AD Group for each RODC or site of RODCs to ensure that the attack surface remains minimal, but this all depends on the maturity of the organization of course.
Here you can see a bad example of a Password Replication Policy where the Denied Group and all the default groups have been removed and only the “Allowed RODC Password Replication Group” is added. This can be found in Active Directory Users and Computers, finding your RODC computer account in the Domain Controller OU and then clicking on the Password Replication Policy tab in the properties screen.

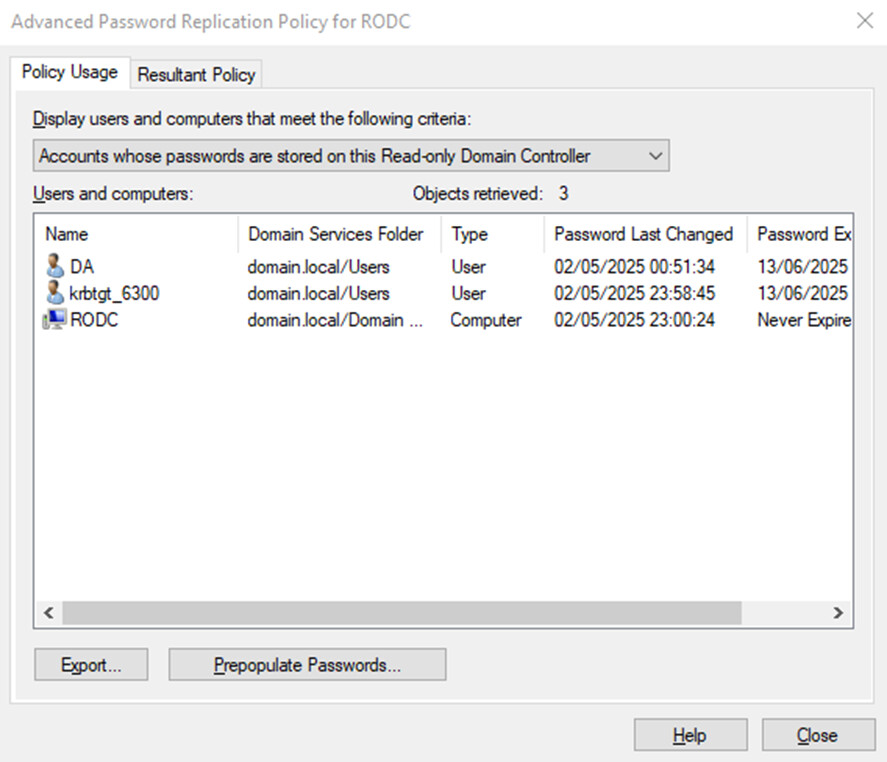
To then find out what accounts have been exposed or authenticated to the RODC you can click on the Advanced button.
Here you can see that this opens on the most critical screen on the tab accounts whose password are stored on this Read-only Domain Controller. In this example my DA Account has its password stored on the RODC which is bad because my DA account is a Domain Admin!
You can also check this with Get-ADReplicationAttributeMetadata connecting to the RODC directly using the LastOriginatingChangeTime on the unicodePwd attribute.
$Da = Get-ADUser DA
$RODC = Get-ADReplicationAttributeMetadata -Object $Da -Server rodc
$RODC | Where { $_.AttributeName -eq "unicodePwd" }

This means that the accounts password is indeed in the NTDS.dit file on the RODC.
Here is more information on the RODC specific attributes and what each one does.
| Attribute | Usage |
|---|---|
| msDS-RevealOnDemandGroup | The password replication policy to know what accounts are allowed to have their passwords replicated to the RODC |
| msDS-NeverRevealGroup | The password replication policy to know what accounts are expressly forbidden to have their passwords replicated to the RODC. |
| msDS-RevealedUsers | Accounts that have had their secrets disclosed to the RODC. This means the account is in the Authenticated To list. |
| msDS-RevealedList | Accounts that have had their secrets replicated to the RODC. This means the password is cached on the RODC. |
Confirming the account password is cached
NOTE: You can trust the screen in the previous window showing the password is on the DC. This is just proving that the account details are present on the RODC and using attack tooling. You should not do this in a production network!!!
To confirm the password is cache we must use tools like DSInternals to interrogate the NTDS.dit file (The active directory database) to see if secrets are present or not.
In this example I’ll use DSInternals just to prove that the account is indeed cached which can be see by having hashes in the secrets section of the output.
# Stop Active Directory Services
Stop-Service NTDS -Force
# Get the Account Information out of the NTDS.dit
Get-ADDBAccount -DistinguishedName (Get-ADUser DA).DistinguishedName -DatabasePath C:\Windows\NTDS\ntds.dit -BootKey (Get-BootKey -Online)
# Start Active Directory Services
Start-Service NTDS
Output
DistinguishedName: CN=DA,CN=Users,DC=domain,DC=local
SamAccountName: DA
UserPrincipalName:
Enabled: True
Deleted: False
Sid: S-1-5-21-3449751313-1047890873-386251990-1105
<truncated>
Secrets
  NTHash: eed224b4784bb040aab50b8856fe9f02
  LMHash:
  NTHashHistory:
    Hash 01: eed224b4784bb040aab50b8856fe9f02
  LMHashHistory:
    Hash 01: ea56cf58eebf554a08976f079c275a45
  SupplementalCredentials:
    ClearText:
    NTLMStrongHash: 0a58ba5466adec76741c51bed019e43b
    Kerberos:
      Credentials:
        DES_CBC_MD5
          Key: 8ff48c20f245fe0b
      OldCredentials:
      Salt: DOMAIN.LOCALDA
      Flags: 0
    KerberosNew:
      Credentials:
        AES256_CTS_HMAC_SHA1_96
          Key: e9a11812aa07db5dfc6806c84b4c5a9b4a97b62ab6915e4654aa784aaf6028cb
          Iterations: 4096
        AES128_CTS_HMAC_SHA1_96
          Key: 83a6640f7780c90271cd58b67d1b334e
          Iterations: 4096
        DES_CBC_MD5
          Key: 8ff48c20f245fe0b
          Iterations: 4096
Now that we know the accounts password is indeed cached we can now use this as a negative test to ensure that removal of the cached password works later in this post.
Remediation
The Password Replication Policy
The password policy should be your first port of call for resolving issues regarding password exposure on RODCs. This can be dependent on the organizational structure so 1 or more of these options listed below may apply to you.
Use the Denied RODC Password Replication Group
Ensure all your privileged accounts are added to Denied RODC Password Replication Group and that the group is added to all RODCs in the domain to ensure no further exposure happens.
Whilst Microsoft does a good job of adding many default exclusions you should look to add any wide privilege groups and accounts you may have to this group. Examples may include:
- All or widely scoped Server Admin groups
- All or widely scope Desktop Admins groups
- General roles for Admins with medium to high-levels of access
- Service Accounts, especially privileged service accounts
To do this you can simply add all the groups and users to Denied RODC Password Replication Group as a part of your standard account management processes. This can be completed by:
- Opening Active Directory Users and Computers
- Right Click on the Domain and select Find
- Find and open the Denied RODC Password Replication Group
- Click on the members tab
- Click Add
- Add in all the identified accounts
- Click Ok
- Click Ok
Ensure the Default groups and accounts are present
It is worth checking the that all the default groups are still present directly in the Password Replication Policy as well as the Denied RODC Password Replication Group.
Default Membership of the Denied RODC Password Replication Group
- Domain Controllers
- Read-Only Domain Controllers
- Enterprise Admins
- Domain Admins
- Schema Admins
- Group Policy Creator Owners
- Cert Publishers
- KRBTGT
The Default Password Replication Policy is documented below
| Principal | Type |
|---|---|
| Allowed RODC Password Replication Group | Allow |
| Denied RODC Password Replication Group | Deny |
| Account Operators | Deny |
| Administrators | Deny |
| Backup Operators | Deny |
| Server Operators | Deny |
The RODC Management Account
RODC’s have a unique ability which is slightly less known which is where you can specify a management group by opening the RODC properties, selecting the Managed By tab and changing the Name to be managed by a specific RODC Admin group which can have specific management accounts that can be vaulted with no other access.
On RODCs this access is granted to the RODC itself rather than just Active Directory to allow simplified management without exposing your true administrative accounts.
Removing the cached password
There are essentially two options here you can either just reset the password for the account and then deny the access as described above or you can use an in-built mechanism in Active Directory where you craft a specific LDAP query to purge the accounts secrets from the RODC, so they are no longer cached.
The name of the function to do this is called rODCPurgeAccount. The Microsoft documentation on this can be found here.
rODCPurgeAccount with LDP
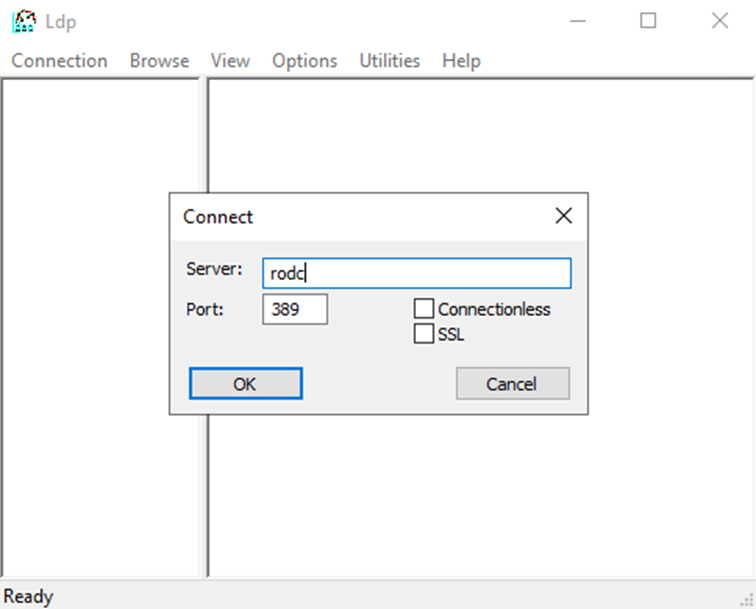
To purge an account from a specific RODC you must first open LDP.exe, connect to the RODC and then trigger a specific modify request. I will take you through this process step by step:
-
Open LDP.exe
-
Click on Connection → Connect
-
Type in the name of the RODC you want to purge the account from and Click OK
-
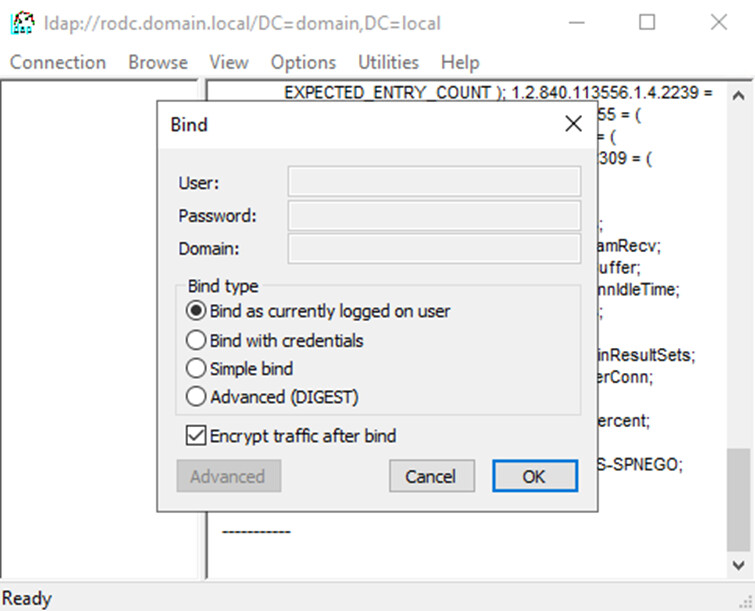
Next, we need to bind to the RODC. Do this by clicking on Connection → Bind and binding with the options that work for you. In this example we use the currently logged on user.
-
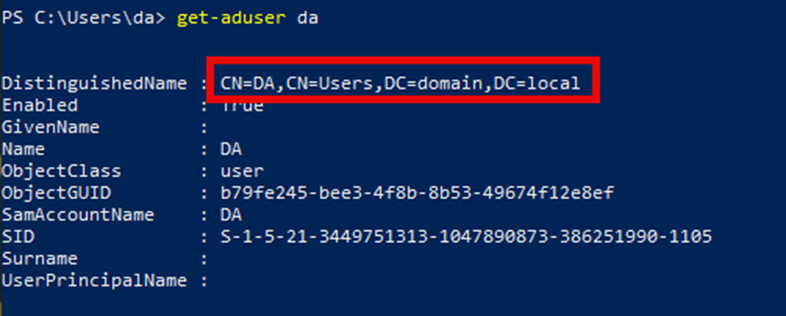
Next, we need to get the Distinguished Name of the user this can be easily got using PowerShell using
Get-ADUserand the username of the user to purge.
-
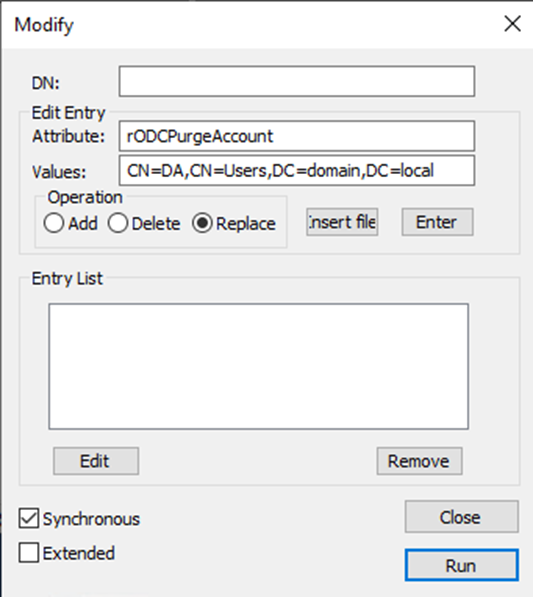
Then we proceed to make your modify request. Click on Browse → Modify to bring up the Modify dialog box
-
Fill in the Modify request with the expected parameters
- DN → Leave Blank
- Attribute → rODCPurgeAccount
- Values → DistinguishedName of the account to purge
- Operation → Replace
-
Press the Enter button to add this to the Entry List
-
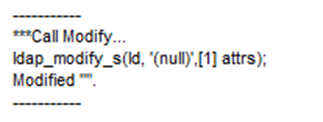
Click Run and note the output in the background

rODCPurgeAccount with PowerShell
It is possible to also remediate this with PowerShell. Below I have made a PowerShell function called Invoke-RODCPurgeAccount that can be used to invoke this specific cleanup.
You can run this command using
Invoke-RODCAccountPurge -RODC <Your_RODC_Name> -AccountDN <The_Account_To_Purge_DistinguishedName>
Here is an example
Invoke-RODCAccountPurge -RODCName rodc -AccountDN (Get-ADUser DA).DistinguishedName
To confirm the purge has happened you now need to connect to the RODC in question with Active Directory Users and Computers, find the RODC in Active Directory and confirm the account no longer shows.
Note: The account will still be present on all other domain controllers as RODCs do not replicate changes. You can see this behavior in the below screenshot.
function Invoke-RODCAccountPurge {
    [CmdletBinding(SupportsShouldProcess=$true, ConfirmImpact='Medium')]
    param(
        [Parameter(Mandatory=$true)]
        [string]$RODCName,

        [Parameter(Mandatory=$true)]
        [string]$AccountDN,

        [Parameter(Mandatory=$false)]
        [string]$Domain = $env:USERDNSDOMAIN,

        [Parameter(Mandatory=$false)]
        [System.Management.Automation.PSCredential]$Credential

    )

    begin {
        Write-Verbose "Starting account purge from RODC $RODCName"
        $params = @{}
        if ($Credential) {
            $params.Credential = $Credential
        }

        # Validate that target is an RODC
        try {
            $dc = Get-ADDomainController -Identity $RODCName -Server $Domain @params
            if (-not $dc.IsReadOnly) {
                throw "The specified domain controller $RODCName is not an RODC."
            }
            # Store the full hostname of the RODC for later use
            $rodcHostName = $dc.HostName
            Write-Verbose "RODC full hostname: $rodcHostName"
        }
        catch {
            Write-Error "Failed to validate RODC $RODCName`: $_"
            return
        }

        # Validate that the account exists
        try {
            $account = Get-ADObject -Identity $AccountDN -Server $Domain @params
            Write-Verbose "Found account: $($account.DistinguishedName)"
        }
        catch {
            Write-Error "Account with DN '$AccountDN' not found: $_"
            return
        }
    }

    process {

        try {
            if ($PSCmdlet.ShouldProcess("$AccountDN on $RODCName", "Purge cached credentials")) {
                # Create LDAP connection to the RODC
                Write-Verbose "Connecting to RODC $rodcHostName"
                $ldapConnection = New-Object System.DirectoryServices.Protocols.LdapConnection $rodcHostName
                $ldapConnection.AuthType = [System.DirectoryServices.Protocols.AuthType]::Negotiate

                if ($Credential) {
                    $ldapConnection.Credential = New-Object System.Net.NetworkCredential $Credential.UserName, $Credential.Password
                }

                try {
                    # Bind to the server first to validate connection
                    $ldapConnection.Bind()
                    Write-Verbose "Successfully authenticated to RODC"
                }
                catch {
                    Write-Error "Failed to authenticate to RODC: $_"
                    return $false
                }

                # Create the modify request with empty DN
                $modifyRequest = New-Object System.DirectoryServices.Protocols.ModifyRequest
                $modifyRequest.DistinguishedName = ""

                # Create the attribute modification for rODCPurgeAccount
                $attributeMod = New-Object System.DirectoryServices.Protocols.DirectoryAttributeModification
                $attributeMod.Name = "rODCPurgeAccount"
                $attributeMod.Add($AccountDN)
                $attributeMod.Operation = [System.DirectoryServices.Protocols.DirectoryAttributeOperation]::Replace

                # Add the attribute modification to the request
                $modifyRequest.Modifications.Add($attributeMod)

                # Send the request
                try {
                    Write-Verbose "Sending LDAP modify request to purge account $AccountDN"
                    $response = $ldapConnection.SendRequest($modifyRequest)
                    Write-Verbose "Successfully purged cached credentials for $AccountDN from $RODCName"
                    $purgeSuccess = $true
                }
                catch [System.DirectoryServices.Protocols.DirectoryOperationException] {
                    $ldapError = $_.Exception.Message
                    # Check for specific LDAP error codes and provide more helpful messages
                    if ($ldapError -match "ERROR_DS_GENERIC_ERROR") {
                        Write-Error "Operation failed: The target server must be an RODC, not a writable DC"
                    }
                    elseif ($ldapError -match "ERROR_DS_CANT_FIND_EXPECTED_NC") {
                        Write-Error "Operation failed: The RODC does not host a replica containing the RODC object"
                    }
                    elseif ($ldapError -match "ERROR_DS_OBJ_NOT_FOUND") {
                        Write-Error "Operation failed: The specified account DN is invalid or not found"
                    }
                    else {
                        Write-Error "LDAP operation failed: $ldapError"
                    }
                    return $false
                }
            }
        }
        catch {
            Write-Error "Failed to purge cached credentials: $_"
            return $false
        }
    }

    end {
        Write-Verbose "Completed account purge operation"
    }
}
Upcoming Product Enhancements
PingCastle version 3.5 will contain better validation logic to enable administrators to use the rODCPurgeAccount method. It does this by checking the msDSRevealedUsers and checking the REPL-PROPERTY-META-DATA of each account found in the msDS-RevealedUsers list and then checking each domain controller to ensure that the UnicodePwd attributes replication metadata is set to epoch time (01/01/1601).