Overview
Of course, your application’s credentials are stored exclusively on your agent and are encrypted using your client certificates. However, these certificates often have an expiration date and must be renewed.
Okay, but how can you ensure that you don’t lose this information, which would become unreadable once the certificate is renewed?
1. Introduction
This document describes, depending on the specific situation, the procedure to follow for:
- Changing the password for the service account used by IIS (agent)
- Renewing the IIS certificate (agent site) before it expires
- When updating the original appsettings.agent.json file (changes to Netwrix Identity Manager (NIM) configuration, new connections, etc.)
- The case of changing the certificate used to encrypt the agent configuration file (appsettings.agent.json)
2. Changing the service account password
2.1. Prerequisites
- Back up to a location outside the folder
C:\UsercubeDemo(and subfolders):- The client.txt file located in the root of the folder
C:\UsercubeDemo - Files
appsettings.jsonandappsettings.encrypted.agent.jsonfrom the folderC:\UsercubeDemo\Runtime
- The client.txt file located in the root of the folder
- Place the appsettings.agent.json file in the
C:\UsercubeDemo\Runtimefolder (the unencrypted file saved on your end during the MEPP/MEP operations for the remote agent) and keep a backup of the original
3. Procedure
3.1. Disabling the scheduler
Before carrying out the update operations, you must disable the agent’s scheduler.
- Before changing the password for the service account used by IIS, you must follow these steps:
- Log in to use the service account on the NIM agent server for the environment affected by this change (PREPRODUCTION or PRODUCTION)
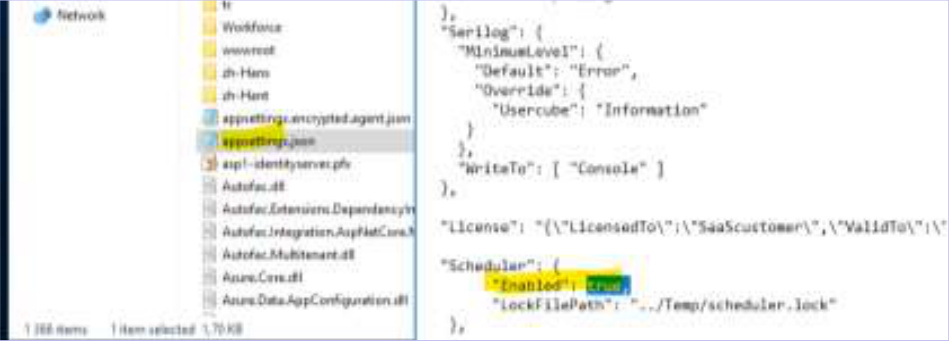
- Edit the
appsettings.jsonfile located in theC:\UsercubeDemo\Runtimefolder

- Change the
Enabledsetting in theSchedulersection and replace the valuetruewithfalse(make sure to keep the comma at the end), then save the file
"Scheduler": {
    "Enabled": false,
    "LockFilePath": "../Temp/scheduler.lock"
},

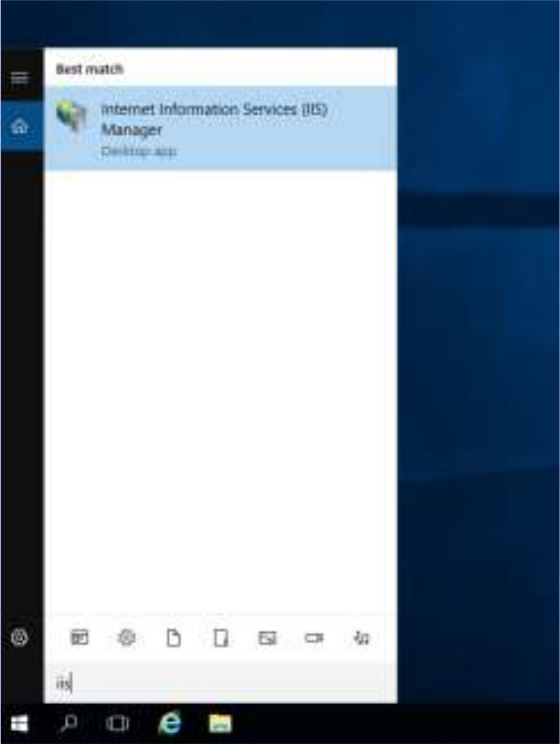
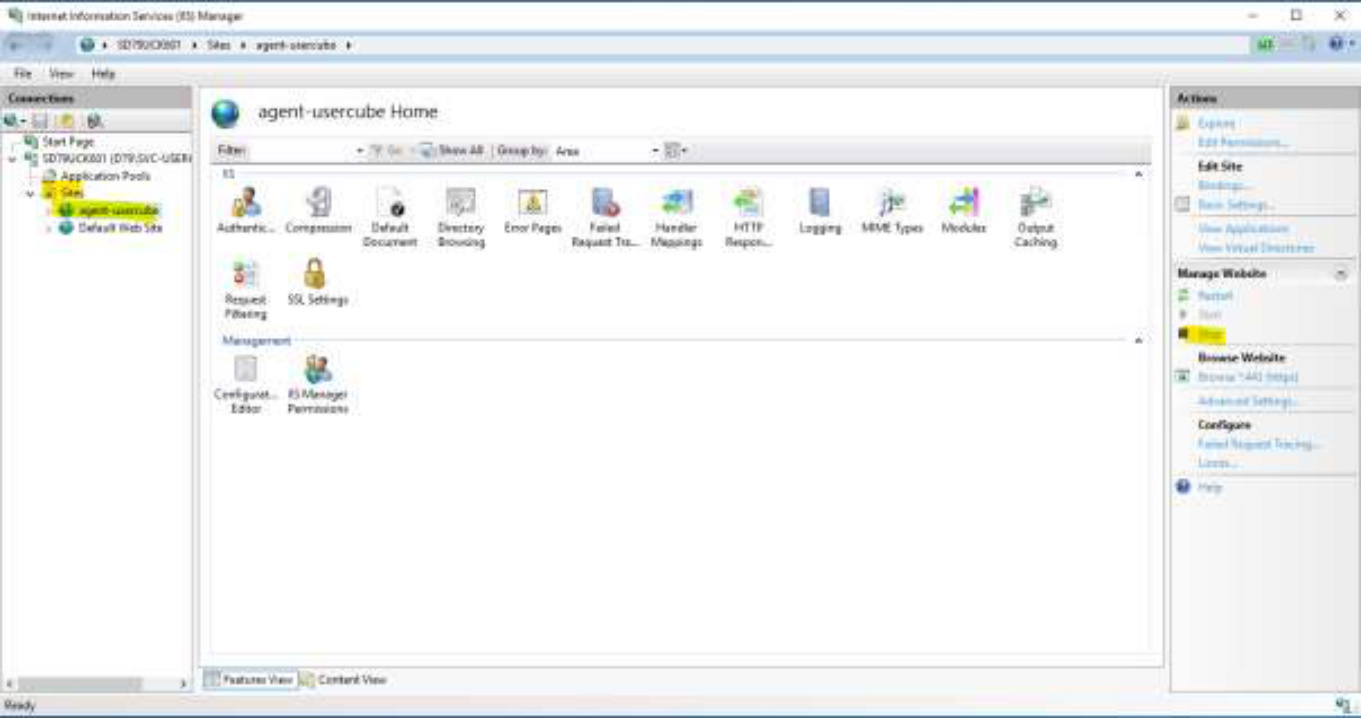
- To apply this change, open the IIS server

- Select the relevant site from the menu on the left and stop the agent site by clicking Stop in the menu on the right (the site agent-pprd-usercube in PREPRODUCTION, agent-usercube in PRODUCTION)

- Click on Application Pools in the left-hand menu, select the application pool for the agent site (agent-pprd-usercube in PREPRODUCTION, agent-usercube in PRODUCTION), then right-click and select Recycle… to recycle the application pool

- Restart the site (scheduler disabled) by selecting the relevant site from the left-hand menu, and start the agent site by clicking Start in the right-hand menu (the site agent-pprd-usercube in PREPRODUCTION, agent-usercube in PRODUCTION)

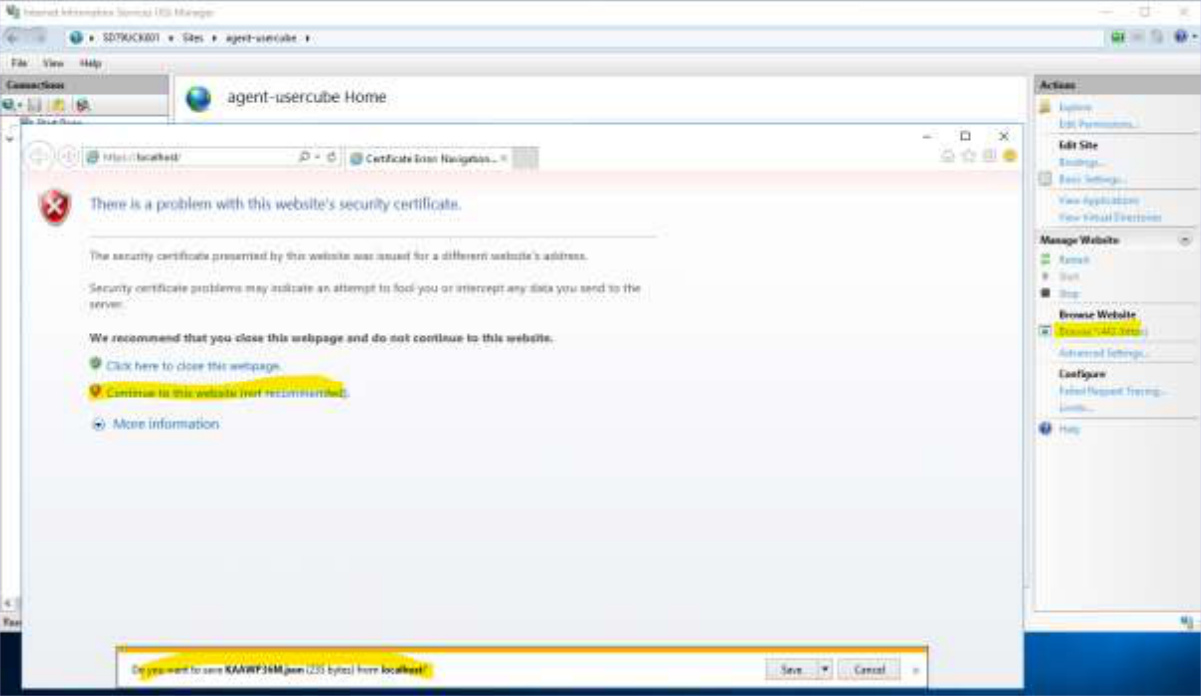
- Go to the agent’s URL to verify that it is running: to do this, select the site as before and click on Browser *:443 (https) in the right-hand menu (confirm the site in the browser page that opens, and click Save to retrieve the generated *.json file)

- Open the saved file: you should see this screen (it confirms that the agent is working properly):
{
  "StartTime": "2023-07-16T12:13:48.4668886+02:00",
  "Uptime": "16.23:42:58.5050122",
  "ServerURI": "https://<server>.usercube.com/",
  "AuthenticationSettings": {
    "Enabled": true,
    "RequireHttpsMetadata": false
  }
}

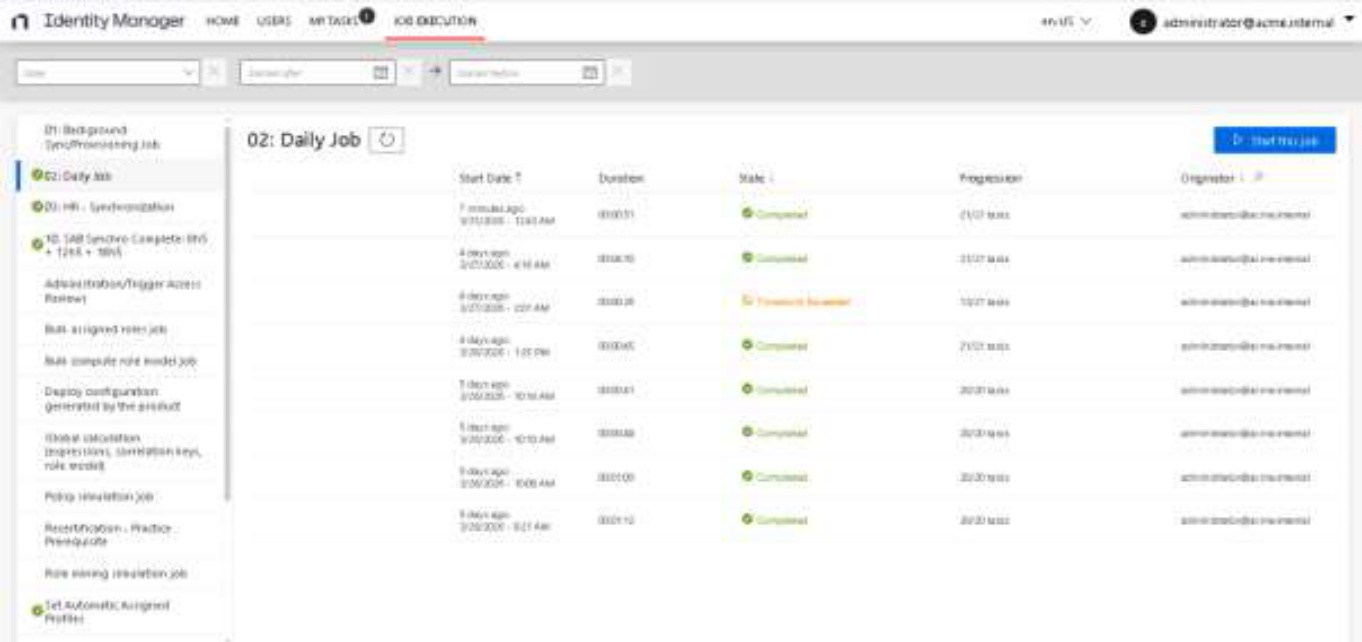
- Log in to the NIM application (you must have admin rights) via a web browser and check that no jobs are running; if any are, wait for them to finish

3.2. Changing the Service Account Password
Change the password for the AD service account used by the NIM agent.
3.3. Updating the AD service account password in the agent setup file
Log in with the service account on the NIM agent server of the environment affected by this change (PREPRODUCTION or PRODUCTION).
Edit the appsettings.agent.json file in the C:\UsercubeDemo\Runtime folder and replace the password of the ADExport and ADFulfillment0 parts with the new password, and save the updated file:
...
"ADExport": {
    "AuthType": "Basic",
    "Login": "****",
    "Password": "",
    ...
},
"ADFulfillment0": {
    "AuthType": "Basic",
    "Login": "****",
    "Password": "",
    ...
},
...
3.4. Encryption of the file appsettings.agent.json post update
Apply the procedure in Part 5.2.2.
3.5. Changing the Password in the Agent Application Pool (IIS)
- Log in with the service account on the NIM agent server of the environment affected by this change (PREPRODUCTION or PRODUCTION)
- Open the IIS Server
- Access Application Pools (left menu) then select the application pool of the agent site (agent-pprd-usercube in PREPRODUCTION, agent-usercube in PRODUCTION), then right-click and click on Advanced Settings…, then in the window that opens, scroll down to the Process Model part, select the Identity line and click on the “…”

- The Custom account is already selected — click Set…
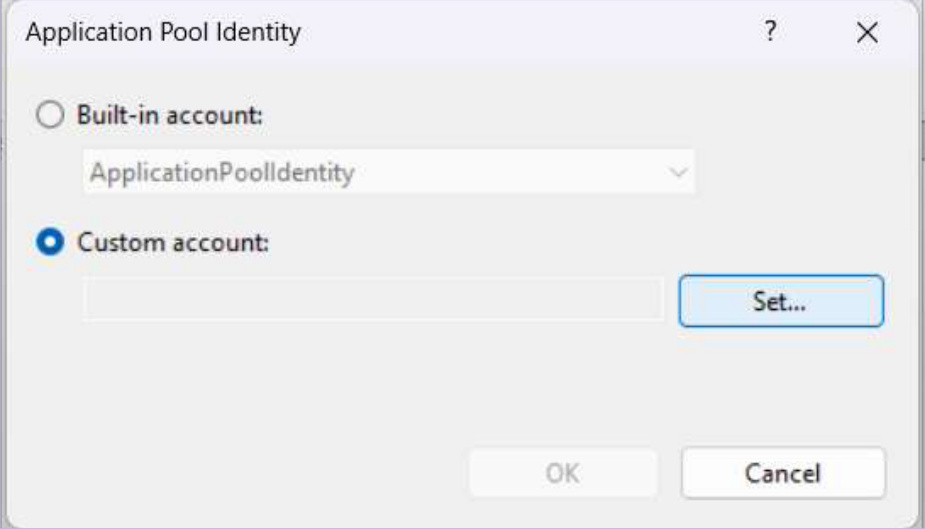
- Enter the domain name of the service account (the domain name of the environment concerned) followed by its login and new password and click OK (if the bind [Login/Password] is not correct, an error will be displayed)

- Then click OK to validate the change

3.6. Client encryption Secret after service account password change
This encryption is necessary to ensure the proper functioning of API calls to NIM from the agent server (scripts/notifications). It must be applied every time the service account password is changed.
-
Log in with the service account on the NIM agent server of the environment affected by this change (PREPRODUCTION or PRODUCTION)
Important: You must absolutely log in with the service account dedicated to the NIM agent and used in IIS as Identity.
-
Retrieve the
clientSecretvalue in the unencryptedappsettings.agent.jsonfile saved on your side during the remote agent’s MEPP/MEP operations. It is present in theOpenIdpart:
...
"OpenId": {
    "OpenIdClients": {
        "Job": ""
    },
    "DefaultOpenIdClient": "Job"
},
...
- Open a PowerShell console as an administrator and enter the following command (the location is not important for execution, but you must make sure to generate the encrypted file in the place expected by the scripts). Replace
*****with the previously retrievedclientSecretto be encrypted:
PS C:\UsercubeDemo\Runtime> ConvertTo-SecureString -String "*****" -AsPlainText -Force | ConvertFrom-SecureString | Out-File C:\UsercubeDemo\client.txt
PS C:\UsercubeDemo\Runtime>
3.7. Reactivating the scheduler
After making the above changes, the agent scheduler must be reactivated.
- Log in with the service account on the NIM agent server of the environment concerned by this change (PREPRODUCTION or PRODUCTION)
- Edit the
appsettings.jsonfile in theC:\UsercubeDemo\Runtimefolder
- Change the
Enabledparameter in theSchedulersection and change the value fromfalsetotrue(keep the comma at the end) and save the file - To apply this change, open the IIS server
- Select the corresponding site from the left menu and stop the agent site by clicking Stop in the right menu (agent-pprd-usercube site in PREPRODUCTION, agent-usercube in PRODUCTION)
- Click on Application Pools in the left menu, select the application pool of the agent site (agent-pprd-usercube in PREPRODUCTION, agent-usercube in PRODUCTION), then right-click and click on Recycle… to recycle the application pool
- Restart the site (scheduler enabled) by selecting the corresponding site from the left menu and start the agent site by clicking Start in the right menu (the agent-pprd-usercube site in PREPRODUCTION, agent-usercube in PRODUCTION)
- Access the URL of the agent to verify that it is running: select the site as before and click, in the right menu, on Browser *:443 (https) (confirm the site in the browser page that opens, and click Save to retrieve the generated *.json file)
- Open the saved file: you should have this display (it confirms that the agent is working properly):
{
  "StartTime": "2023-07-16T12:13:48.4668886+02:00",
  "Uptime": "16.23:42:58.5050122",
  "ServerURI": "https://<server>.usercube.com/",
  "AuthenticationSettings": {
    "Enabled": true,
    "RequireHttpsMetadata": false
  }
}

- Log in to the NIM application (you must have the admin profile in the application) from a browser and check that the processing runs nominally

4. Renew the Agent Site Certificate (IIS) before it expires
4.1. Prerequisites
Have a new, valid, trusted certificate on the agent server generated with the DNS of the NIM Agent’s IIS website:
DNS Agent:

PRODUCTION to example:    agent-usercube.local
PREPRODUCTION to example: agent-pprod-usercube.local
4.2. Procedure
4.2.1. Importing the new IIS agent site certificate
Before changing the binding of the IIS site, the new certificate must be imported into the local “store” of the server:
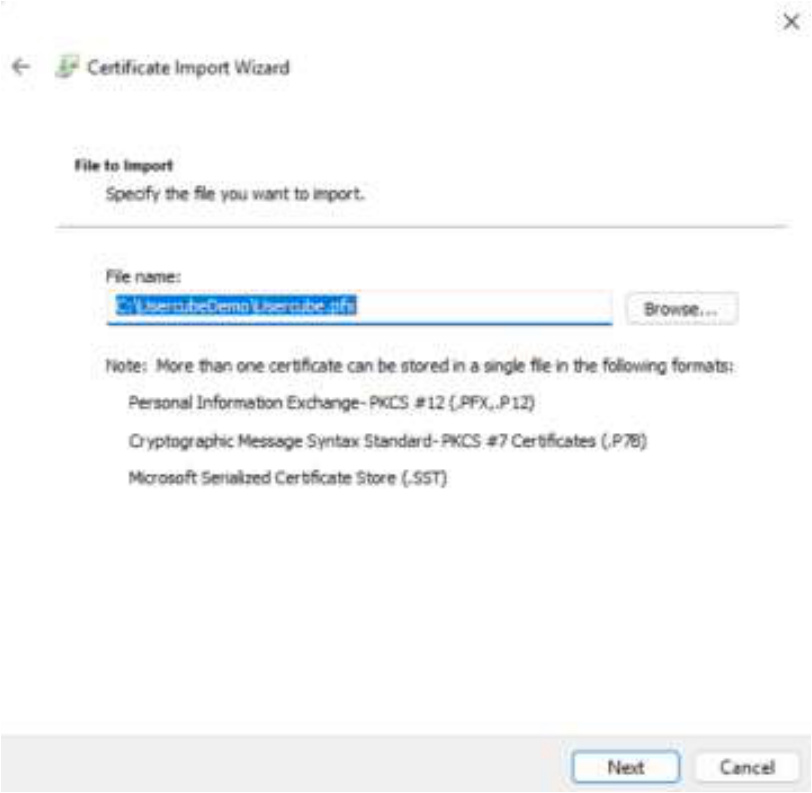
- To import the certificate, double-click on the
*.p12/*.pfxand follow the steps below:- Log in with the service account on the NIM agent server of the environment affected by this change (PREPRODUCTION or PRODUCTION)
- Go to the desired
*.pfx(new certificate) (e.g.,Usercube.pfx) and double-click on the file, select Local Machine and then click Next

- On the next screen, click Next (do not change anything)
- Enter the certificate password, do not make the key exportable, and then click Next

- Leave the current setting and click Next (automatic placement of the certificate in the store)

- Confirm the import by clicking Finish

4.2.2. Switch the IIS Agent Site to the New Certificate
- Log in with the service account on the NIM agent server of the environment affected by this change (PREPRODUCTION or PRODUCTION)
- Open the IIS Server

- Select the corresponding site from the menu on the left and click on Bindings… in the right-hand menu

- Select the current line (port 443) and click Edit…
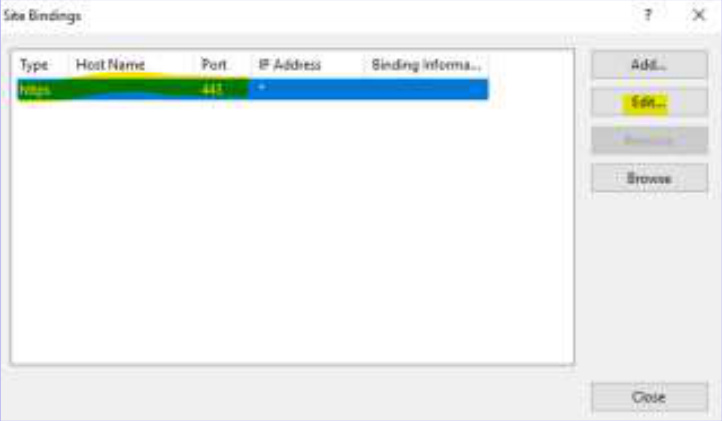
- Select the new certificate and then click OK

Note: An error can occur if the certificate is non-compliant and/or the IIS service account cannot access the certificate’s private key:

In the event log (Windows Logs\System), you will see an error indicating that the service account does not have access to the certificate’s private key:

In the event of an error selecting the certificate, refer back to section 4.2 of this procedure.
4.2.3. Verify that the IIS agent site is working properly after the operation
- Log in with the service account on the NIM agent server of the environment affected by this change (PREPRODUCTION or PRODUCTION)
- To restart the IIS agent site, open the IIS server

- Select the corresponding site from the left menu and stop the agent site by clicking Stop in the right menu (agent-pprd-usercube site in PREPRODUCTION, agent-usercube in PRODUCTION)
- Click on Application Pools in the left menu, select the application pool of the agent site (agent-pprd-usercube in PREPRODUCTION, agent-usercube in PRODUCTION), then right-click and click Recycle… to recycle the application pool

- Restart the site by selecting the corresponding site from the left menu and start the agent site by clicking Start in the right menu (the agent-pprd-usercube site in PREPRODUCTION, agent-usercube in PRODUCTION)

- Access the URL of the agent and check that it is started: select the site as before and click, in the right menu, on Browser *:443 (https) (confirm the site in the browser page that opens, and click Save to retrieve the generated *.json file)

- Open the saved file: you should have this display (it confirms that the agent is working properly):
{
  "StartTime": "2023-07-16T12:13:48.4668886+02:00",
  "Uptime": "16.23:42:58.5050122",
  "ServerURI": "https://<server>.usercube.com/",
  "AuthenticationSettings": {
    "Enabled": true,
    "RequireHttpsMetadata": false
  }
}

- Connect to the NIM application (you must have admin rights) from a browser and check that the processing runs nominally
5. Update of the appsettings.agent.json file following an evolution of the NIM configuration (new connectors / new connections / …)
5.1. Prerequisites
- Make a backup outside the
C:\UsercubeDemofolder (and subfolders):appsettings.jsonandappsettings.encrypted.agent.jsonfiles from theC:\UsercubeDemo\Runtimefolder
- Drop the saved and upgraded/updated
appsettings.agent.jsonfile in theC:\UsercubeDemo\Runtimefolder
5.2. Procedure
5.2.1. Disabling the scheduler/stopping the application
- Log in with the service account on the NIM agent server of the environment affected by this change (PREPRODUCTION or PRODUCTION)
- Edit the
appsettings.jsonfile in theC:\UsercubeDemo\Runtimefolder

- Change the
Enabledparameter in theSchedulersection and change the value fromtruetofalse(keep the comma at the end) and save the file
"Scheduler": {
    "Enabled": false,
    "LockFilePath": "../Temp/scheduler.lock"
},

- To apply this change, open the IIS server
- Select the corresponding site from the left menu and stop the agent site by clicking Stop in the right menu (agent-pprd-usercube site in PREPRODUCTION, agent-usercube in PRODUCTION)
- Click on Application Pools in the left menu, select the application pool of the agent site (agent-pprd-usercube in PREPRODUCTION, agent-usercube in PRODUCTION), then right-click and click Recycle… to recycle the application pool

5.2.2. Updated appsettings.agent.json file encryption
- Log in with the service account on the NIM agent server of the environment affected by this change (PREPRODUCTION or PRODUCTION)
- Open a PowerShell console as an administrator and then move to the Runtime folder of the product:
PS C:\UsercubeDemo\Runtime>
- Enter the following command to generate the agent file encrypted with the current certificate specified in the
appsettings.json/EncryptionCertificatesection (make sure that theappsettings.encrypted.agent.jsonfile does not exist — if necessary delete it before running the command):
PS C:\UsercubeDemo\Runtime> .\Usercube-Protect-X509JsonFile.exe --input-json-file-path "C:\UsercubeDemo\Runtime\appsettings.agent.json" --output-json-file-path "C:\UsercubeDemo\Runtime\appsettings.encrypted.agent.json"
PS C:\UsercubeDemo\Runtime>
The encrypted file is generated.
5.2.3. Reactivating the scheduler/starting the application
After making the above changes, you need to re-enable the agent scheduler and start it.
- Log in with the service account on the NIM agent server of the environment affected by this change (PREPRODUCTION or PRODUCTION)
- Edit the
appsettings.jsonfile in theC:\UsercubeDemo\Runtimefolder

- Change the
Enabledparameter in theSchedulersection and change the value fromfalsetotrue(keep the comma at the end) and save the file - To apply this change, open the IIS server

- Click on Application Pools in the left menu, select the application pool of the agent site (agent-pprd-usercube in PREPRODUCTION, agent-usercube in PRODUCTION), then right-click and click Recycle… to recycle the application pool
- Restart the site by selecting the corresponding site from the left menu and start the agent site by clicking Start in the right menu (the agent-pprd-usercube site in PREPRODUCTION, agent-usercube in PRODUCTION)
- Access the URL of the agent and check that it is started: select the site as before and click, in the right menu, on Browser *:443 (https) (confirm the site in the browser page that opens, and click Save to retrieve the generated *.json file)

- Open the saved file: you should have this display (it confirms that the agent is working properly):
{
  "StartTime": "2023-07-16T12:13:48.4668886+02:00",
  "Uptime": "16.23:42:58.5050122",
  "ServerURI": "https://<server>.usercube.com/",
  "AuthenticationSettings": {
    "Enabled": true,
    "RequireHttpsMetadata": false
  }
}

- Connect to the NIM application (you must have admin rights) from a browser and check that the processing runs nominally

6. Change the certificate to be used for file encryption appsettings.agent.json
6.1. Prerequisites
- Make a backup outside the
C:\UsercubeDemofolder (and subfolders):appsettings.jsonandappsettings.encrypted.agent.jsonfiles from theC:\UsercubeDemo\Runtimefolder
- Drop the saved and upgraded/updated
appsettings.agent.jsonfile in theC:\UsercubeDemo\Runtimefolder
6.2. Procedure
This procedure allows you to change the certificate used when encrypting the appsettings.agent.json file.
6.2.1. Disabling the scheduler/stopping the application
- Log in with the service account on the NIM agent server of the environment affected by this change (PREPRODUCTION or PRODUCTION)
- Edit the
appsettings.jsonfile in theC:\UsercubeDemo\Runtimefolder- Change the
Enabledparameter in theSchedulersection and change the value fromtruetofalse(keep the comma at the end) and save the file
- Change the

"Scheduler": {
    "Enabled": false,
    "LockFilePath": "../Temp/scheduler.lock"
},

- To apply this change, open the IIS server

- Select the corresponding site from the left menu and stop the agent site by clicking Stop in the right menu (agent-pprd-usercube site in PREPRODUCTION, agent-usercube in PRODUCTION)

- Click on Application Pools in the left menu, select the application pool of the agent site (agent-pprd-usercube in PREPRODUCTION, agent-usercube in PRODUCTION), then right-click and click Recycle… to recycle the application pool

6.2.2. Import the certificate to be used for appsettings.agent.json encryption
Follow the procedure for importing the certificate specified in section 4.2 (same procedure, but this is not for the IIS site certificate).
Retrieve the value of the certificate’s thumbprint by looking it up from MMC (the retrieved value should not have any spaces — remove spaces from the retrieved string; you can use the current thumbprint value from the appsettings.json file).
6.2.3. Switch to the certificate to use for appsettings.agent.json encryption
- Log in with the service account on the NIM agent server of the environment affected by this change (PREPRODUCTION or PRODUCTION)
- Go to the
C:\UsercubeDemo\Runtimefolder and edit theappsettings.jsonfile- In the
EncryptionCertificatesection, replace**with the thumbprint of the certificate to be used and save the file:
- In the
...
"EncryptionCertificate": {
    "Thumbprint": "**",
    "StoreLocation": "LocalMachine",
    "StoreName": "My",
    "UseEncryptedAppsettings": true,
    "EncryptFile": false
},
...
6.2.4. Encrypt the appsettings.agent.json file with the new certificate
Follow the procedure in section 5.2.2.
6.2.5. Reactivating the scheduler/starting the application
After making the above changes, you need to re-enable the agent scheduler and start it.
- Log in with the service account on the NIM agent server of the environment affected by this change (PREPRODUCTION or PRODUCTION)
- Edit the
appsettings.jsonfile in theC:\UsercubeDemo\Runtimefolder- Change the
Enabledparameter in theSchedulersection and change the value fromfalsetotrue(keep the comma at the end) and save the file
- Change the

- To apply this change, open the IIS server

- Click on Application Pools in the left menu, select the application pool of the agent site (agent-pprd-usercube in PREPRODUCTION, agent-usercube in PRODUCTION), then right-click and click Recycle… to recycle the application pool

- Restart the site by selecting the corresponding site from the left menu and start the agent site by clicking Start in the right menu (the agent-pprd-usercube site in PREPRODUCTION, agent-usercube in PRODUCTION)

- Access the URL of the agent and check that it is started: select the site as before and click, in the right menu, on Browser *:443 (https) (confirm the site in the browser page that opens, and click Save to retrieve the generated *.json file)

- Open the saved file: you should have this display (it confirms that the agent is working properly):
{
  "StartTime": "2023-07-16T12:13:48.4668886+02:00",
  "Uptime": "16.23:42:58.5050122",
  "ServerURI": "https://<server>.usercube.com/",
  "AuthenticationSettings": {
    "Enabled": true,
    "RequireHttpsMetadata": false
  }
}

- Connect to the NIM application (you must have admin rights) from a browser and check that the processing runs nominally
