The goal of this procedure is to help partners and customer understand and configure an HR connector.
The following diagram explains the architecture and the global flow for any HR synchronization.
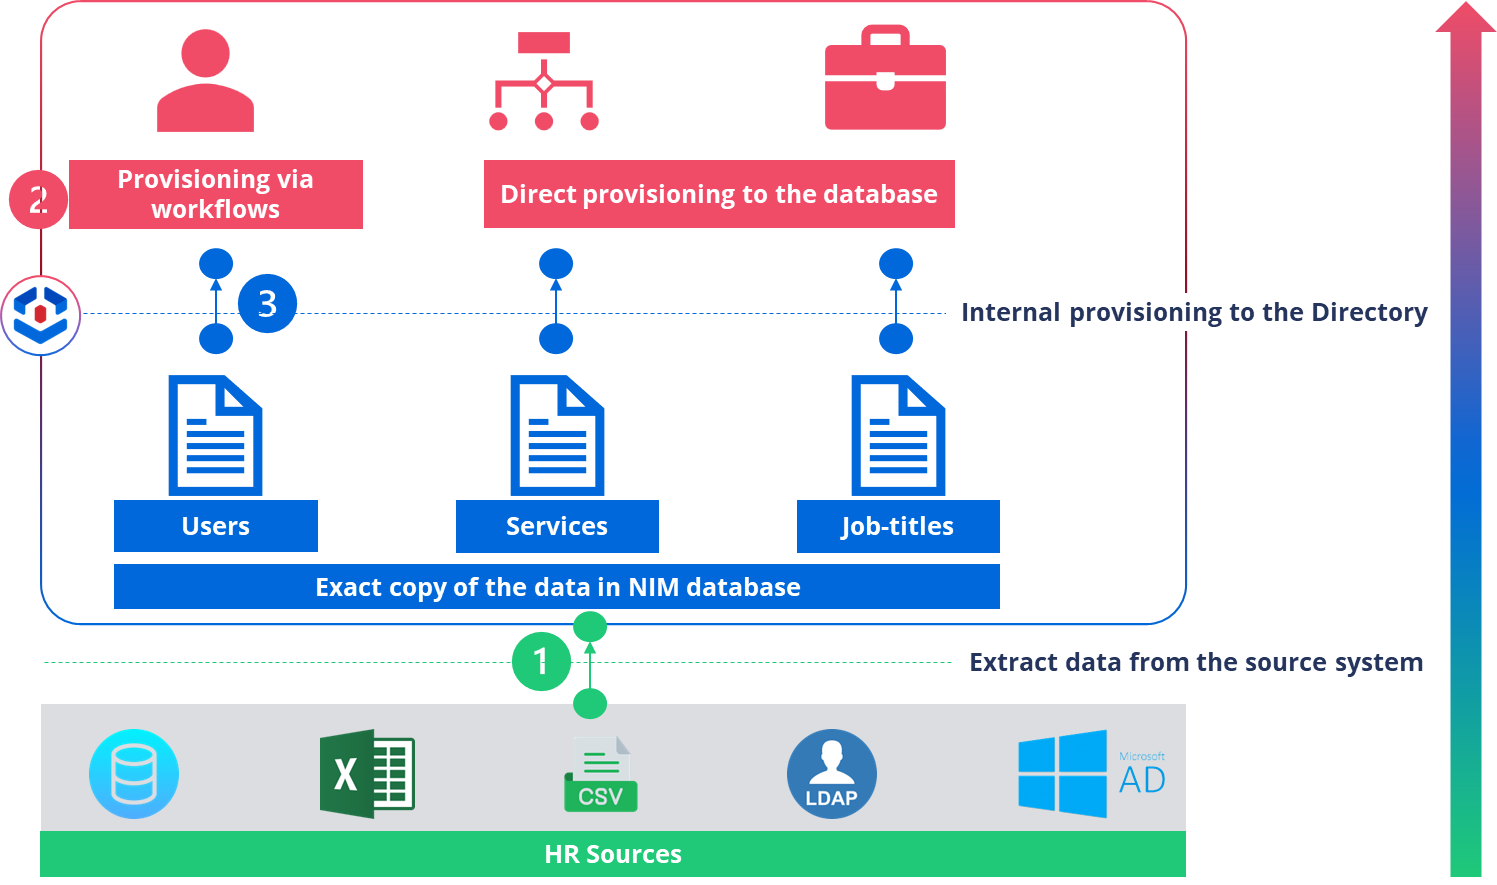
Basically, configuring an HR connector is a 3 steps process:
- Configure the connector to extract the raw data from the HR system and load it into NIM’s database.
- Configure the HR workflows to be executed whenever an event is detected (joiner, mover, leaver, etc.)
- Configure the mapping between the HR raw data and NIM directory data
Note: This procedure is based on the Core IGA configuration.
To configure an HR connector in Netwrix Identity Manager, follow these steps:
0 - Model Your Data
Before configuring the connector, model the data you want to import from your HR system.
Identify the entities (e.g., Person, Department, Site, UserType, etc.) and their relationships (e.g., Person-Department, Person-Manager) that will be represented in Identity Manager.
This step is typically done outside of Identity Manager, often in collaboration with HR staff who have access to the HR data.
1 - Configure the HR Connector (From UI)
1.1 - Create the connector
- Go to the Configuration section in the Identity Manager UI and select Connectors.
- In the top right corner, click on the addition icon (+) to create a new connector.
- Fill in the required fields:
- Identifier: Unique, starts with a letter, contains only letters, numbers or ”-”.
- Name: Display name for the connector.
- Agent: Select the agent that will connect to the HR system.
- Complete job: uncheck “Provisioning” and keep only “Synchronization”
- Incremental job: uncheck “Provisioning” and keep only “Synchronization”
- Click on +Create button
1.2 - Configure the connection
- Create connections for each HR file (e.g., CSV, SQL, etc.) you want to import.
Note: This example is based on CSV - In the Connections section, click on the addition icon “+” to create a new Connection
- Fill in the required fields:
- Identifier: Unique, starts with a letter, contains only letters, numbers or `-`.
- Name: Display name for the connection.
- Package: click on “Select a Package” then search for the CSV package and click on “Select”
- Fill in the connection settings
- Path (Complete mode): full or relative path to the CSV file (for relative paths the reference folder is Runtime)
- Path (Incremental mode): full or relative path to the CSV file if any (for relative paths the reference folder is Runtime)
- Encoding
- Separator
- Number of lines to skip
- Values to Trim
- Click on Create & Close in the top right
- Repeat the steps for each CSV file
1.3 - Configure the Entity Types
- Create entity types that correspond to your HR data model (e.g., HR_Person).
- In the Entity Types section, click on the addition icon to create a new Entity Type
- Fill in the required fields:
- Identifier: Unique.
- Name: Display name for the Entity Type.
- Plural Display Name
- Click on “Properties”
- Select the Entity Type source from “Source” list (in the left side)
Note: If the list is empty or the source does not exist, make sure that connector Schema has been refreshed. - In the right side click on “Map scalar properties”. Select the list of attributes you want to map then, click on “Map selected columns”
- Select the “Mapping key”: represents the primary unique key
- Select the “Key properties” represent secondary unique keys that can be used for query rules.
- Click on “Create & Close”
- Click on “Reload” in the top left
- Repeat the steps for each Entity Type
1.4 - Synchronize the Data
- In the Entity Type section click on “Jobs” then, “Complete Mode > All Tasks”
- In the left side click on “Job Results” to check the connector’s logs and ensure synchronization completes successfully (A new tab opens).
- Go to Home. In the navigation panel (left side) click on “Connectors//” (i.e., “Connectors/HR/HR Person”) and verify that the data has been correctly synchronized
2 - Create HR workflows (XML)
Note: This part cannot be performed from the UI
- Custom NIM workflows are created using XML. You can find an example in hereDirectory User UI HR Sync.xml (5,3 Ko).
- Add this file to your “Conf” folder
- Deploy the configuration
3 - Map data from HR to Directory (From the UI)
3.1 - Configure the Directory connections
Create connections for internal provisioning.
- Go to the Configuration section in the Identity Manager UI and select Connectors.
- Select the “Directory” connector
- In the Connections section, click on the addition icon “+” to create a new Connection
- Fill in the required fields:
- Identifier: Unique, starts with a letter, contains only letters, numbers or `-`.
- Name: Display name for the connection.
- Package: click on “Select a Package” then search for the Workflow package and click on “Select”
- Fill in the connection settings
- Workflow Json Path: full or relative path to the JSON file (for relative paths the reference folder is Runtime)
- Resource is a record: Checked
- Resource Entity Type: Directory_UserRecord
- Parent Resource Entity Type: Directory_User
- Navigation from Resource to its parent: User
- Navigation from Parent Resource to Resource: Records
- Source Entity Type: Identifier of the Entity Type representing Person defined in the HR connector (example: HR_Person)
- Key Property of the Resource: Identifier of the property used to unquely identify a person in the HR connector (e.g.: Employee_Id)
- Source Parent Entity Type: HR_Person
- Key Property of the Parent Resource: Employee_Id
- Fulfill Internal Workflow Configurations
- Change Type: Added
- Workflow Identifier: Directory_User_CreateFromHR
- Transition Identifier: Action-ActionPending-Execute
- Message: $Changes:LastName$ $Changes:FirstName$ - $Changes:EmployeeId$
- Body: $Changes:LastName$ $Changes:FirstName$ - $Changes:EmployeeId$
- Scalar Properties: list of scalar attributes (e.g.: EmployeeId, UserIdentifier, LastName, FirstName, BirthName, MobileNumber, VIP, Suspended, Email, Login)
- Navigation Properties: list of links (e.g.: Title, UserType, EmployeeType, Organization, Site, Company, Subsidiary, User, PersonalTitle)
- Date Properties: list of date attributes (e.g.: ContractStartDate, ContractEndDate, BirthDate)
- Change Type: Modified
- Workflow Identifier: Directory_User_UpdateFromHR
- Transition Identifier: Action-ActionPending-Execute
- Message: $Resource:LastName$ $Resource:FirstName$ - $Resource:EmployeeId$
- Body: $Resource:LastName$ $Resource:FirstName$ - $Resource:EmployeeId$
- Scalar Properties: list of scalar attributes (e.g.: EmployeeId, UserIdentifier, LastName, FirstName, BirthName, MobileNumber, VIP, Suspended, Email, Login)
- Navigation Properties: list of links (e.g.: Title, UserType, EmployeeType, Organization, Site, Company, Subsidiary, User, PersonalTitle)
- Date Properties: list of date attributes (e.g.: ContractStartDate, ContractEndDate, BirthDate)
- Change Type: Deleted
- Workflow Identifier: Directory_User_DeleteFromHR
- Transition Identifier: Action-ActionPending-Execute
- Message: $Resource:LastName$ $Resource:FirstName$ - $Resource:EmployeeId$
- Body: $Resource:LastName$ $Resource:FirstName$ - $Resource:EmployeeId$
- Scalar Properties: empty
- Navigation Properties: empty
- Date Properties: ContractEndDate
- Click on “+Create & Close” in the top right
3.2 - Create resource types to internally provision the data from HR to the Directory.
- In the Resource Types, click on the addition icon “+” to create a new Resource Type
- Fill in the required fields:
- Identifier: Unique.
- Name: Display name for the Resource Type.
- Policy: Select Default
- Source Entity Type: Select the HR source Entity Type: Person
- Target Entity Type: Select the Directory target Entity Type: User
- Category: Select “Sources” or create it if it does not exist
- Require Provisioning Review: Select “No”
- In the right side click on the arrow “v” and select the workflows connection previously created.
- Click on “+Create” button in the top right
- In the Resource Types, get back to the Resource Type previously created.
- Click on Correlation Rules tab
- Click on the addition icon “+” to create a new Rule
- Select the policy Default
- In the Target Object > Property Path, select Identifier
- In the Source Object > Property Path, select Employee_Id
- Click on “Create” button
- Click on “More Rules” to be redirected to the HR to Directory_User mapping rules (A new tab opens)
- Click on the addition icon “+” to create a new Scalar Rule
- Select the policy Default
- Select the Resource Type created previously (e.g.: User (from HR))
- In the Target Object > Property, select Identifier
- In the Source Object > Property, select Employee_Id
- Click on “Create” button
- Click on Resource Types tab
- Click on the addition icon “+” to create a new Resource Type Rule
- Select the policy Default
- Select the Resource Type created previously (e.g.: User Record (from HR))
- Click on “Create” button
- Go back to the connector UI
- In the Resource Types, click on the addition icon “+” to create a new Resource Type
- Fill in the required fields:
- Identifier: Unique.
- Name: Display name for the Resource Type.
- Policy: Select Default
- Source Entity Type: Select the HR source Entity Type: Person
- Target Entity Type: Select the Directory target Entity Type: User Record
- Category: Select “Sources” or create it if it does not exist
- Require Provisioning Review: Select “No”
- In the right side click on the arrow “v” and select the workflows connection previously created.
- Click on “+Create” button in the top right
- In the Resource Types, get back to the Resource Type previously created.
- Click on Correlation Rules tab
- Click on the addition icon “+” to create a new Rule
- Select the policy Default
- In the Target Object > Property Path, select EmployeeId
- In the Source Object > Property Path, select Employee_Id
- Click on “Create” button
- Click on “More Rules” to be redirected to the HR to Directory_UserRecord mapping rules (A new tab opens)
- Click on the addition icon “+” to create a new Scalar Rule
- Select the policy Default
- Select the Resource Type created previously (e.g.: User Record (from HR))
- In the Target Object > Property, select EmployeeId
- In the Source Object > Property, select Employee_Id
- Click on “Create” button
Repeat this action for each scalar/date attribute to map from HR to Directory User Record
- Click on “Queries” tab
- Click on the addition icon “+” to create a new Query Rule
- Select the policy Default
- Select the Resource Type created previously (e.g.: User Record (from HR))
- In the Target Object > Property to fill, select the identity attribute used to store the link (e.g.: Organization)
- In the Target Object > Property Path, select the key property for the object to link to the identity (e.g: Identifier)
- In the Source Object > Property, select the attribute value from the source (e.g.: Organization)
- Click on “Create” button
Repeat this action for each link attribute to map from HR to Directory User Record
- Click on Resource Types tab
- Click on the addition icon “+” to create a new Resource Type Rule
- Select the policy Default
- Select the Resource Type created previously (e.g.: User Record (from HR))
- Click on “Create” button
3.3 - Provision the data
- Go back to the connector UI
- In the Resource Types section click on “Jobs” then, “All Provisioning Tasks”
- In the top left side click on “Job Results” to check the connector’s logs and ensure the provisioning completes successfully (A new tab opens).
4 - Global jobs (XML)
Note: This part cannot be performed from the UI
- If not created yet, global jobs can be configured using XML
- You can find an example in here Global Jobs.xml (588 Octets).
- Add this file to the “Conf” folder
- Deploy the configuration
- Once the configuration deployed, go to Home page then “Job Execution” menu
- Run the job “94: Daily Job” for a full synchronization of the HR data