Overview
I had been tasked with investigating if Netwrix could be used to handle a specific use case revolving around self elevation of privileges within the Google Workspace suite. After poking around between both the Google API’s, Netwrix API’s, and Netwrix’s custom PowerShell activity type, I found it to be not only possible, but FAAAIRLY straightforward. Since I had to prod a bit at Netwrix to figure out some of the internal functions, I figured I would share both the redacted code for elevating into a Google workspace role, as well as some of what was learned along the way. Hopefully someone else can get some value from this post.
Guide
Here I will show you a fairly step-by-step process for getting this code to work in a Google workspace environment. I make no promises or guarantees on the safety of the code/instructions below and encourage you to do your due diligence when reviewing it. As always, test in a test environment and if you break prod, don’t come looking for me!
With that out of the way, lets start.
Prepping Google Workspace
Lets get our Google workspace API enabled and a service account created.
-
Navigate to https://console.cloud.google.com/ and create a new project in your tenant.
-
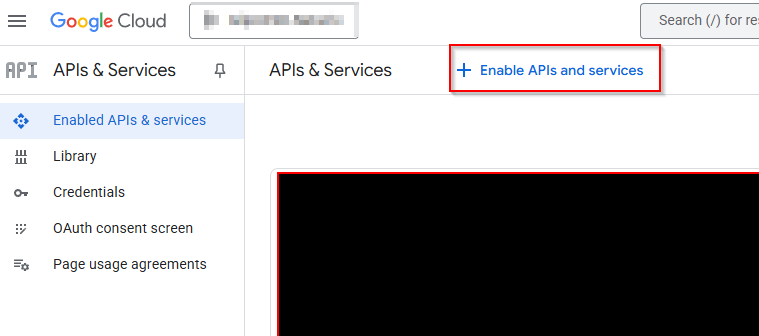
Once your project is created, go to the API dashboard (https://console.cloud.google.com/apis) so we can enable the required APIs. From here, select the Enable APIs and services button
- Search for Admin SDK API and select it from the list and select Enable from the API screen.

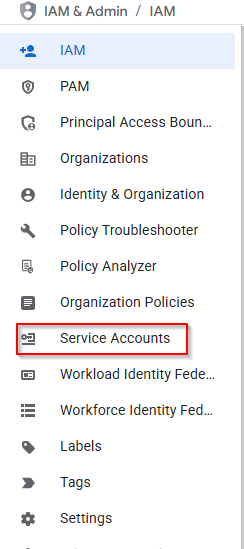
- Now lets go to the IAM management to create the service account. Navigate to https://console.cloud.google.com/iam-admin and select service accounts from the left navigation bar.
-
Now create the service account with whatever name/description suites you and grant it at least viewer privileges.
-
Next, create a new auth key from the keys tab of the service account. Be sure to select p12 as the key type!

-
Download your p12 key somewhere safe for now. We will need it later
-
Next, we need a valid service account in our workspace directory. So create a new user in the Google directory, and add them to the super admin role. This user has to be in the super admin role as it is the only role that has access to role management, and to do role management we must impersonate a user (the service account we are creating in this step).
-
While in Workspace, navigate to the following domain wide delegation page to assign our service account access to specific permission scopes. From this page, select add new and add your service account client ID/Unique ID from step 5. Enter the following scopes in the OAuth scopes
https://www.googleapis.com/auth/admin.directory.rolemanagement,
https://www.googleapis.com/auth/admin.directory.user,
https://www.googleapis.com/auth/admin.directory.orgunit,
https://www.googleapis.com/auth/admin.directory.user.readonly,
https://www.googleapis.com/auth/admin.directory.rolemanagement.readonly
Prepping the Netwrix Node(s)
In this section we will prep the Netwrix node(s) with the required PowerShell module and our P12 auth key. Repeat all steps on all nodes in your Netwrix cluster.
- run the below command to install PSGSuite. Alternatively, if your node does not have network access, simply pull the module from the github and add it to your module folder manually.
Install-Module PSGSuite -Scope AllUsers
-
Copy your P12 auth key to the node. You can copy it anywhere as it will only need to be here temporarily. I would suggest the root of your drive for simplicity.
-
Restart the SBPam proxy services. This will restart all Netwrix services and seems to be required. Without the service restart Netwrix’s flow for calling custom PowerShell code will not import required assemblies and types from the PSGSuite module.
The Netwrix Activity Code
I struggled a bit on how to keep this as clean and re-usable as possible since Netwrix does not directly allowing you to create re-usable functions within the activities. I considered creating a new function script in the SBPam script directory, but that seemed too unintuitive and difficult to troubleshoot if needed. I ended up landing on keeping all my code in the actual activity and controlling it from there. There are two activities I will list below, one is used to setup our PSGSuite config in the actionservice user scope, and the other is what will be published to technicians and users.
PSGSuite Configuration
Create a new activity with just a single custom powershell action within it. Then replace all the code with the below code. Replace the variables with information you’ve gotten from the Google IAM page. The AdminEmail should be the account that is within the superadmin role in the workspace directory.
Add-SbPAMActionLog -Type Info -Message "Running on $SbPAMRestApiUri"

$configs = @{
        SetAsDefaultConfig     = $true
        ConfigName             = "Netwrix"
        P12KeyPath             = "FULL_PATH_TO_AUTH_KEY.p12"
        AppEmail               = "SERVICEACCOUNT@DOMAIN.iam.gserviceaccount.com"
        CustomerID             = "CUSTOMERID"
        Preference             = "CustomerID"
        ServiceAccountClientID = "SERVICEACCOUNTCLIENTID"
        Domain                 = "DOMAIN"
        AdminEmail             = "WORKSPACE_DIRECTORY_SERVICE_ACCOUNT"
    }
Set-PSGSuiteConfig @configs -Verbose -Scope User

Add-SbPAMActionLog -Type Info -Message "Updated PSGSuite config on $SbPAMRestApiUri"
Assign this activity to yourself in an access policy and run it. If you have multiple nodes that are service meshed, run this a few times, checking the logs to confirm it runs on each node. Once it has run on every node in your cluster, you can unassign the activity from yourself and proceed to the actual activity that will move the user into the role. Once this has run, you can also remove the P12 from the Netwrix nodes (maybe test the whole process first though)
Workspace Role Elevation Activity
Create a new activity with a custom PowerShell script as the Pre-Session step and input the code below. You will need to just update the variable $RoleIDToElevateTo with the ID of the role you want to elevate to. You can acquire this from the URL when viewing the role in the workspace admin webpage.
Import-Module PSGSuite

$RoleIDToElevateTo = "11111111111111111"


#Confirm our user exists in Netwrix
if (![string]::IsNullOrEmpty($UserId)) {
    $targetUser = Get-SbPAMUser -Id $UserId
    $UPN = $targetUser.UserPrincipalName
    if ($null -ne $targetUser) { $login = (Get-LoginFromSamAccountname -User $targetUser) }
    if ([string]::IsNullOrEmpty($login)) {
        Write-Error "Unable to find user."
        exit 1
    }
    Add-SbPAMActionLog -Type Info -Message ("User $UPN initiated activity.")
}

#Get our Google roles
Add-SbPAMActionLog -Type Info -Message ("Querying Google for roles...")
$roles = Get-GSAdminRole
Add-SbPAMActionLog -Type Info -Message ("Retrieved $($roles.count) roles from Google.")

#Make sure you put in the ID of a valid role
if ($roles.roleID -notcontains $RoleIDToElevateTo) {
    Add-SbPAMActionLog -Type Error -Message ("No roleID in Google matching $RoleIDToElevateTo!")
    exit(1)
}

#Get our Google role assignments for our user
Add-SbPAMActionLog -Type Info -Message ("Querying Google for role assignments for user $UPN...")
$roleAssignments = @(Get-GSAdminRoleAssignment -UserKey $UPN -ErrorAction SilentlyContinue)
Add-SbPAMActionLog -Type Info -Message ("Retrieved $($roleAssignments.count) role assignments from Google for $UPN")

#Check if the user is already in this role or not
if ($RoleIDToElevateTo -iin $roleAssignments.RoleId) {
    Add-SbPAMActionLog -Type Warn -Message ("$UPN already has a role assignment for role $RoleIDToElevateTo!")
}

else {
    #Assign the role to the user
    Add-SbPAMActionLog -Type Info -Message ("Assigning $UPN to the role of $RoleIDToElevateTo ...")
    New-GSAdminRoleAssignment -AssignedTo $UPN -RoleId $RoleIDToElevateTo
    Add-SbPAMActionLog -Type Info -Message ("$UPN has been assigned to the role of $RoleIDToElevateTo")
}
Now, create another custom Powershell step under the Post-Session actions. Replace the default code with the below code, again, updating the $RoleIDToElevateTo with your desired role.
Import-Module PSGSuite

$RoleIDToElevateTo = "11111111111111111"

#Confirm our user exists in Netwrix
if (![string]::IsNullOrEmpty($UserId)) {
    $targetUser = Get-SbPAMUser -Id $UserId
    $UPN = $targetUser.UserPrincipalName
    if ($null -ne $targetUser) { $login = (Get-LoginFromSamAccountname -User $targetUser) }
    if ([string]::IsNullOrEmpty($login)) {
        Write-Error "Unable to find user."
        exit 1
    }
    Add-SbPAMActionLog -Type Info -Message ("User $UPN initiated activity.")
}

#Get our Google roles
Add-SbPAMActionLog -Type Info -Message ("Querying Google for roles...")
$roles = Get-GSAdminRole
Add-SbPAMActionLog -Type Info -Message ("Retrieved $($roles.count) roles from Google.")

#Make sure you put in the ID of a valid role
if ($roles.roleID -notcontains $RoleIDToElevateTo) {
    Add-SbPAMActionLog -Type Error -Message ("No roleID in Google matching $RoleIDToElevateTo!")
    exit(1)
}

#Get our Google role assignments for our user
Add-SbPAMActionLog -Type Info -Message ("Querying Google for role assignments for user $UPN...")
$roleAssignments = @(Get-GSAdminRoleAssignment -UserKey $UPN -ErrorAction SilentlyContinue)
Add-SbPAMActionLog -Type Info -Message ("Retrieved $($roleAssignments.count) role assignments from Google for $UPN")

#Check if the user is already in this role and remove them if so
if ($RoleIDToElevateTo -iin $roleAssignments.RoleId) {
    $roleToBeRemoved = $roleAssignments | Where-Object {$_.RoleId -eq $RoleIDToElevateTo}
    Add-SbPAMActionLog -Type Info -Message ("$UPN has a role assignment for role $RoleIDToElevateTo")
    Add-SbPAMActionLog -Type Info -Message ("Removing $UPN role assignment for role $RoleIDToElevateTo ...")
    Remove-GSAdminRoleAssignment -RoleAssignmentId $roleToBeRemoved.RoleAssignmentId
    Add-SbPAMActionLog -Type Info -Message ("Removed $UPN from role $RoleIDToElevateTo")
}

else {
    Add-SbPAMActionLog -Type Warn -Message ("$UPN was not found to be in role $RoleIDToElevateTo")
}
Now simply assign this policy to yourself and test that it works! The most likely issue will be related to the PSGSuite configuration, but those errors should bubble up fairly clearly into the log for the activity. Again, as stated above, test this in a test environment if you are interested in using it!
Tips
There are a few takeaways I have gotten from this task that I would like to share both as advice to others, and as suggestions/requests to the Netwrix team.
-
You must remember to restart the Netwrix services after installing PSGSuite! Not doing this caused me way more of a headache than I’d like to admit. Random errors related to non-loaded assemblies, missing types, etc. Meanwhile the module worked fine when run from the actual node! My best guess here is that Netwrix is not creating new PowerShell processes for these scripts, but calling them from an initially spawned process, thus not loading in newly added module dependencies.
-
The Add-SbPAMActionLog cmdlet can take the following message type parameters: Info, Warn, Error. This just wasn’t documented anywhere and even when traced in the calling code simply passes the data over to a rest endpoint without any validation from the PowerShell function. While not a big deal, knowing the types of messages to report to users are important!
-
Don’t call exit() from within your custom script. Any call to exit(), with or without a return code, will result in your activity reporting as an error. I had initially setup the scripts to use some earlier exit calls and was confused why Netwrix was throwing errors in my logs even when returning a 0 return code. I did not get to test how it handles a return call, but my guess is that might work better.
-
Troubleshooting these custom PowerShell scripts is really a pain through the Netwrix platform. I would love to hear some insight into how the devs here have the workflow setup for them. Naturally I tested in a normal IDE, but at some point I have to migrate it into the custom action step, assign it to a policy, run the policy, check for errors, and go back. Especially with some of the odd behavior I saw when first importing the PSGSuite module, this workflow slowed me down tremendously.
-
Not as much a tip as an odd issue this whole process has, but note that looking at historical views of this activity will only show the action logs from the removal action step. I do not know why the provisioning step logs just… disappear, but for us that’s not a deal breaker. If any dev wants to chime in why this behavior might happen, or if I am supposed to reference the first actionlog’s ID to maintain it, I’d love to know.
This was resolved and updated in the code snippets. It seems to have been an issue related to referencing the ActionQueueActionId
Final Thoughts
This has taken me a bit to write up, so I hope someone can either get value from the provided code directly, or from the additional information it/I provide. If anything this does go to show that Netwrix functionality can be extended into a platform not officially supported. I’d love to see official support in the future, but for now, this works for our very specific use case.
Happy holidays to all those celebrating this upcoming weekend!